This little mudroom is getting lots of storage!
We first installed the shoe cabinet, then the cubbies, and now it's the turn for that back cabinet.
I call it a back cabinet, but in reality, I simply closed up that space, adding a couple of shelves and a sliding door.
According to the plan, I had to build a cabinet back there, but that would've been a waste of materials since I already had lovely walls in that corner.
My son's first task was installing shelf supports on the three walls. It's the first time he's installed anything on the walls. He started very shakily, but by the end, he was showing that drill who was boss. :D
Then I closed up the space even more because the plan was to install a sliding door, and that opening was too wide to conceal most of the door behind the cabinet. I added a very long 1 x 10 board to that side of the cabinet. (right picture below)
*This post contains affiliate links for your convenience. Click here to read my full disclosure policy.
Matt was in charge of painting these cabinets. He first applied a coat of primer, then two coats of Behr White - Semi-gloss finish.
Then, it was my turn to install the shelves. Each shelf has two boards; otherwise, it wouldn't fit through the narrow door/opening.
Then, I used a small drill bit and kept drilling the holes as straight as possible.
I changed the drill bit for a larger one and marked how deep I needed to go (use the screw eye to set that mark).
I call it a back cabinet, but in reality, I simply closed up that space, adding a couple of shelves and a sliding door.
According to the plan, I had to build a cabinet back there, but that would've been a waste of materials since I already had lovely walls in that corner.
My son's first task was installing shelf supports on the three walls. It's the first time he's installed anything on the walls. He started very shakily, but by the end, he was showing that drill who was boss. :D
Then I closed up the space even more because the plan was to install a sliding door, and that opening was too wide to conceal most of the door behind the cabinet. I added a very long 1 x 10 board to that side of the cabinet. (right picture below)
*This post contains affiliate links for your convenience. Click here to read my full disclosure policy.
Matt was in charge of painting these cabinets. He first applied a coat of primer, then two coats of Behr White - Semi-gloss finish.
Then, it was my turn to install the shelves. Each shelf has two boards; otherwise, it wouldn't fit through the narrow door/opening.
I didn't secure them to the supports; they have a tight fit, and I wanted them removable to allow more space when working on the sliding door mechanism.
This was also the moment to add the trim to the top of this area (right picture below).
The next task: BUILDING AND INSTALLING THE SLIDING DOOR
This sliding door was inspired by the Sliding Barn Door my friend Jaime built right HERE.
The door designs are different, but the mechanism is quite similar and very inexpensive.
Let me show you how it all went for me!
The Materials I used:
The tools you'll need:
1. MAKE A DOOR MOCK-UP
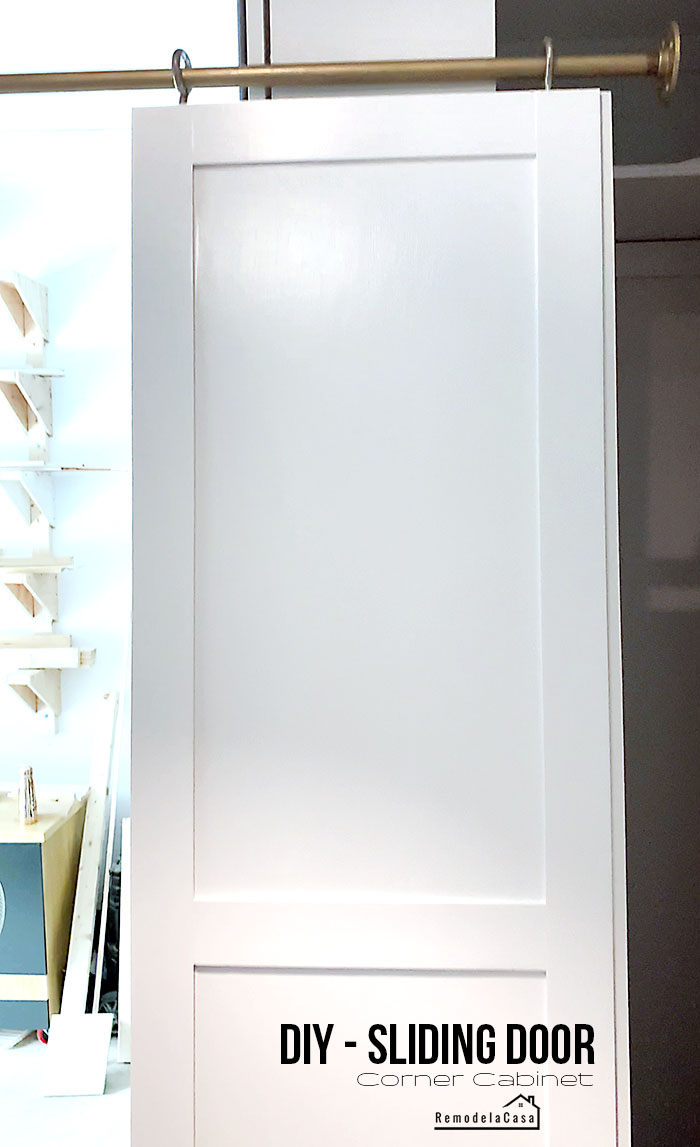
The first step is to make a mock-up of the door. I used a scrap piece of plywood as my door, but the most critical part is installing those screw eyes straight on the edge of the plywood, as the mobility of this sliding door depends on them.
I made pre-drills, but they weren't too straight. You can see the eye screws tipping to the left, yep. Very slanted. Glad it was a practice piece.
You can also notice that the rod is installed on the shelf support.
2. BUILD THE DOOR
I cut the plywood to size. The little mock-up door is also a good guide for height measurement. Width-wise, I made the door a half-inch wider than the opening.
After painting the plywood, I used wood glue and 3/4" brad nails to install the decorative lattice molding all around it.
This was also the moment to add the trim to the top of this area (right picture below).
The next task: BUILDING AND INSTALLING THE SLIDING DOOR
This sliding door was inspired by the Sliding Barn Door my friend Jaime built right HERE.
The door designs are different, but the mechanism is quite similar and very inexpensive.
Let me show you how it all went for me!
The Materials I used:
- 3/4" plywood to the size of your door.
- 2 1/2" Lattice molding to trim the door and give it a shaker-style
- 3/4" Metal pipe to your needed length
- 1 Galvanized flange
- 1 Galvanized end cap
- 2 3/8 In X 4-7/8 In Screw eyes
- 2 Concealed 2" Casters
The tools you'll need:
1. MAKE A DOOR MOCK-UP
The first step is to make a mock-up of the door. I used a scrap piece of plywood as my door, but the most critical part is installing those screw eyes straight on the edge of the plywood, as the mobility of this sliding door depends on them.
I made pre-drills, but they weren't too straight. You can see the eye screws tipping to the left, yep. Very slanted. Glad it was a practice piece.
You can also notice that the rod is installed on the shelf support.
2. BUILD THE DOOR
I cut the plywood to size. The little mock-up door is also a good guide for height measurement. Width-wise, I made the door a half-inch wider than the opening.
After painting the plywood, I used wood glue and 3/4" brad nails to install the decorative lattice molding all around it.
At this point, I didn't install the lower piece of lattice, waiting for a dry fit, in case I need to trim the door.
3. INSTALL THE SCREW EYES
Then it was time to install the screw eyes. I was nervous; I wanted to install them straight, but I had no tools to make the pre-drills dead straight.
I just took my time and went first, using an awl to mark the exact point where to make the holes.
3. INSTALL THE SCREW EYES
Then it was time to install the screw eyes. I was nervous; I wanted to install them straight, but I had no tools to make the pre-drills dead straight.
I just took my time and went first, using an awl to mark the exact point where to make the holes.
Then, I used a small drill bit and kept drilling the holes as straight as possible.
I changed the drill bit for a larger one and marked how deep I needed to go (use the screw eye to set that mark).
Then, once again, I changed the drill bit. Drilling the holes one more time with the 5/16" bit, which is the perfect fit for the screw eyes I was using.
The screw eyes were then installed. They were straight, but they both ended up looking different ways. 🤪
I left them like that. They would be hidden. If you do it, pay attention to how they face when you start screwing them, so you end up with both of them in the same way.
4. INSTALL THE CASTERS
Turn the door's front face down and install the casters.
4. INSTALL THE CASTERS
Turn the door's front face down and install the casters.
I love these hidden casters; they give the front of the cabinet a clean look.
5. INSTALL THE FLANGE
I installed the flange, but then I had to remove it because it's a tight fit. Notice how I also had to make a groove on the top shelf for it to rest nicely on the flange.
Ok, this was the moment of truth, passing the pipe through the screw eyes... installing it.
| Hidden Casters |
5. INSTALL THE FLANGE
I installed the flange, but then I had to remove it because it's a tight fit. Notice how I also had to make a groove on the top shelf for it to rest nicely on the flange.
Ok, this was the moment of truth, passing the pipe through the screw eyes... installing it.
And ta-daaaah!
It worked! 🙂
I had to remove it to patch those holes, paint, and add the missing trim pieces.
I also added a stop block in the corner of the cabinet.
I'm telling you, I love these casters!! ❤️❤️
Here is one more pic before removing it.
Here's my pretty sliding door after I gave it some glam. The holes were patched, a couple of coats of paint were applied, and the hardware was spray-painted gold.
I still need to install it, but I'm waiting to finish a few other tasks in this small area.
I've been recording most of this process. You can check those videos on my Instagram account right HERE. Go to the saved stories—Mudroom 4 for this sliding door project.
-------------------- . * . * . * . * . * . -------------------
Here are all the projects that were tackled during this mudroom build:
*This post contains affiliate links.


New comments are not allowed.