DIY Inset Cabinet Doors: A Beginner's Guide (Built-Ins Part 8)
If there is one project I've been dreading for a year, it's building DIY inset cabinet doors. I postponed this task for so long that I almost forgot why I was avoiding it. But finally, I decided to tackle the job, and now I'm asking myself: Why did I wait so long? It turns out, building your own cabinet doors isn't as intimidating as it seems!
Looking Back: From Procrastination to Progress
Exactly one year ago, I was in a mad rush to finish this room for Christmas. Between installing the coffered ceiling and painting the entire room, I was exhausted. I told myself I'd handle the "little details" later.
Well, "later" turned into twelve months. The missing quarter-round molding and the bare cabinet openings were driving me crazy.
From the moment I ripped out the old baseboards to the nearly finished room you see in the photo above, a massive chunk of time passed. (You can catch up on the entire renovation journey by clicking the links at the end of this post!)
But today, the waiting ends. Let's build some doors!
Why Inset Doors?
I'll admit it: I was scared. Since these were the very first cabinet doors I've ever built, the precision required for inset doors felt overwhelming.
Disclaimer: This isn't a professional woodworking tutorial; it's a look into my beginner process. If you're a DIYer considering inset doors, here is exactly how I did it—imperfections and all.
The good news? They work! They open and close smoothly, and that is a huge win in my book.
The Materials
For this project, I kept it simple with materials from the local hardware store:
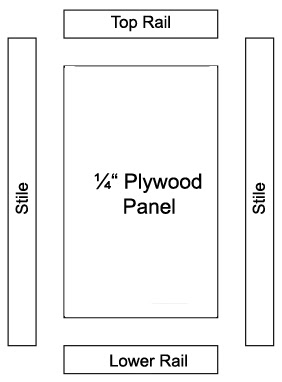
Rails and Stiles: 1x3 Pine
Inside Panels: ¼" Plywood
Step-by-Step: Building the Doors
1. Measure and Cut the Material
Precision is everything with inset doors. I measured the cabinet openings multiple times to be certain.
The Math: I sized the doors to allow for a 1/16" clearance all the way around.
The Cut: I used a miter saw to cut my stiles (vertical pieces) and rails (horizontal pieces) to size.
2. Making the Rabbet Cuts
Usually, a table saw or a router table is the easiest way to make the grooves for the panels.
Since I don't own either, I used a handheld router to create rabbet cuts. These are the "notches" where the plywood panel sits inside the frame.
 |
| Ryobi ONE+ Trim Router |
3. Drilling Pocket Holes
To connect the frame, I used pocket hole joinery. Using my Kreg Jig, I drilled two pocket holes into each end of the rails.
 |
| Kreg Jig | Drill |
4. Assembling the Frames
I put the frames together using 1¼" screws.
Pro Tip: Do a "dry fit" first! I didn't use glue at this stage. I used a screwdriver with a square drive bit to secure them. This allows you to disassemble the frame easily if the fit isn't perfect. Also, if you’re building multiple doors, LABEL THEM immediately!
5. The Moment of Truth: The Dry Fit
Once the frames were assembled, I took them to the cabinets. It must have been beginner's luck (or my obsessive measuring), because they fit perfectly!
6. Drilling Concealed Hinge Holes
Hinges can be a nightmare for rookies. There are thousands of options! After a "crash course" in cabinet hardware, I chose hinges with these specific features:
Concealed: Hidden from the outside.
Inset-specific: Designed for doors that sit inside the frame.
Face-frame compatible: To match my cabinet style.
Soft-close & 3-way adjustability: Essential for fixing minor alignment issues.
 |
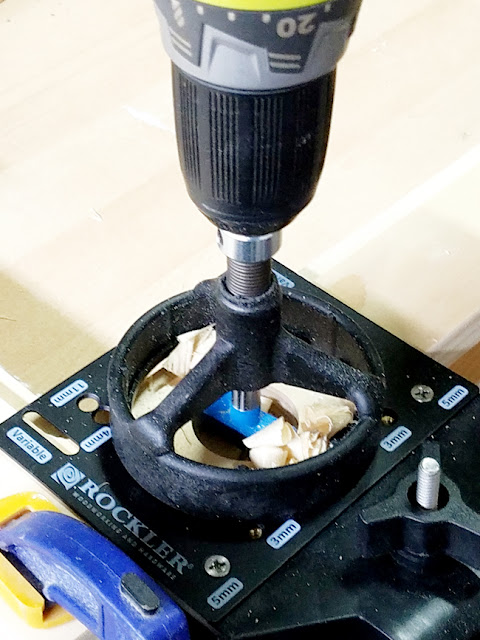
| Rockler Jig It | Long Shank Carbide Forstner Bit |
To install them, I used a Rockler Hinge Jig. I set the holes 3" from the top and bottom. The jig made the process stress-free, and I breezed through all eight holes without a hitch.
 |
| Blum Inset Face Frame Hinges |
7. Installing the Panels
I cut the ¼" plywood to size, using a utility knife to slightly round the corners so they fit snugly into the routed frames.
8. Fill, Sand, and Repeat
I filled the pocket holes and any tiny gaps with wood filler. Once dry, I sanded everything smooth.
 |
| Wood Filler |
Sanding: I sanded the entire door, finishing with 120-grit sandpaper to ensure a professional finish.
9. Prime and Paint
I applied two coats of high-quality primer, sanding lightly between coats. For the final look, I used a paint sprayer to apply two coats of semi-gloss paint for a smooth, factory-like finish.
10. Final Installation
The final step was mounting the hinges to the cabinets.
I'll be honest: I hit a wall here! My brother-in-law stepped in to help hang the four doors. We also added door stoppers because the doors were swinging a bit too far into the cabinet.
The Finished Look
I am so incredibly happy with how these turned out.
Are they perfect? No.
Do they look great and function perfectly? Yes!
They still need a few tiny adjustments to make the gaps perfectly even, but seeing them finished and organized makes all that procrastination feel silly.
 |
| | Cabinet Knobs | |
 |
| | Shibori Tapestry Wall Art | Door trim | |


Christina -- you are my "she-ro"! I am so impressed with all of your projects. You are an inspiration. I do a lot of DIY projects, but not to the extent you do. One thing I might share, you can get outlet box extenders (I got mine at Lowes -- they are blue plastic which inserts into the outlet space in front of the original box. You pull the wires through and the extender then is anchored to the front of the cabinet or wall face. Replace the cover and it is completely flush!
ReplyDeleteHehehe I like that she-ro word! Thanks so much girl. 💕 I remember using those outlet extenders in the kitchen when installing the backsplash. I have never used that outlet there inside that cabinet that I guess I didn't even pay much attention to the fact that is so recessed back. Next time I get to the big store I'll buy one. Thanks! ;)
DeleteWhat a great outcome! If I thought for one minute I could make doors like that, I'd start today! You did a great job and provided great directions. Super congrats on a difficult project. As always, it's perfection! ~~ Susie from The Chelsea Project
ReplyDeleteOh, I'm sure you can, Susie! Now even more, after all the work you just completed! ;)
DeleteCristina, I'm impressed every single time you share a project like this. Many years ago I took a woodworking class on Wednesday nights with my friend. Actually it wasn't a formal class. The teacher was a daytime shop teacher and told us we could make anything we wanted. My first project was a cherry blanket chest made from rough lumber. Yup... that meant I had to join, glue, and plane the boards. They came out pretty well. Except, the breadboard end on the top, a chip came out of the wood because the glue stuck to the clamp. It's amazing how strong glue is. The Top board was so heavy that the shop teacher and his friend cut the finish edge for me on the machine that is like a router but is on a stand. (I think it has a different name but I can't remember.) Otherwise I did it all myself with lots of coaching of course. I was scared to death to use those machines, but I did it scared. Over the course of a few years I made lots of items and gave away many as gifts. And that was the end of my woodworking career. We've just moved around too much and I've lost my nerve for using power tools. It takes nerve and I applaud you. Your work may not be perfect to you... but I think you should be very proud of what you've accomplished. You and your project are FABULOUS!!
ReplyDeleteXO
Isn't it amazing all the experiences we have gone thru? As I was reading your story I could just see the twinkle of wonder in your eye, witnessing the beautiful cherry blanket chest you had just created! It's sad to hear you didn't continue that path. Otherwise you would've been a master carpenter right now! :) Its never too late to jump back on the horse ;)
DeleteMy first woodworking experience happened when I was in high school in my natal Colombia, it wasn't that greatest first experience. I enrolled in this woodworking class and I had to create a shelf, a small decorative shelf. The first task was to smooth out the piece of wood we had brought. Well, I spent a whole lot of time using a hand plane to smooth that piece but no matter how hard I tried it didn't get smooth! It turned out that the board had a layer of cement on it. :/ The teacher had to use the heavy equipment to get rid of that stuff. So, even though I finished the little shelf, I wasn't impressed with woodworking. Who would have known that almost 30 years later I would immerse myself into it?! The desire to bring beauty to my home was so strong that I had to do it. There was no way around it! And even now, as I finish each of my projects I stand there in disbelief that I'm able to do such kind of work.
Diane, thanks so much for your heartfelt comment and as I said it before, for being a cheering, motivating and inspiring force!
Hugs,
Cristina
Cristina, these cabinet doors are amazing! I have saved your post in my favorites. I have asked santa for Kreg this Christmas and I am hoping to learn to make cabinet doors. Do you have a tutorial on how to use a router for beginners? And would you tell me what router bit you used? How did you determine the size of the plywood inset? Thank you
ReplyDeleteCynthia Schuster - Parker, CO
Thanks Cynthia! No, I don't have a tutorial on how to use the router, but there are thousands of them on the web. Also, many video tutorials on You Tube that you can watch. I used a ½" rabbeting router bit. I determined the size of the plywood insets after the frame was assembled, measuring that inner part. There on Step 7, you can even see, I placed the plywood piece on top of the frame to mark its length.
DeleteHey, good luck with Santa's request. That's an amazing tool!
Awesome job with the doors, they came out great!
ReplyDeleteThanks so much!! Far from perfect, but they're still doing their job. :)
Delete