

There's nothing more dramatic than painting a room's walls shiny black to make a bold statement in your home.
Black is a beautiful and versatile color, one of the best background colors for art or accent pieces to pop.
Contrary to popular belief, painting a room in a glossy black finish doesn't turn it into a small black cave. Light bounces off shiny black walls, making the room look even bigger.
However, there's a downside to the glossy black paint treatment: it can't hide marks, scuffs, or wall repairs. It will show most of the wall's imperfections.
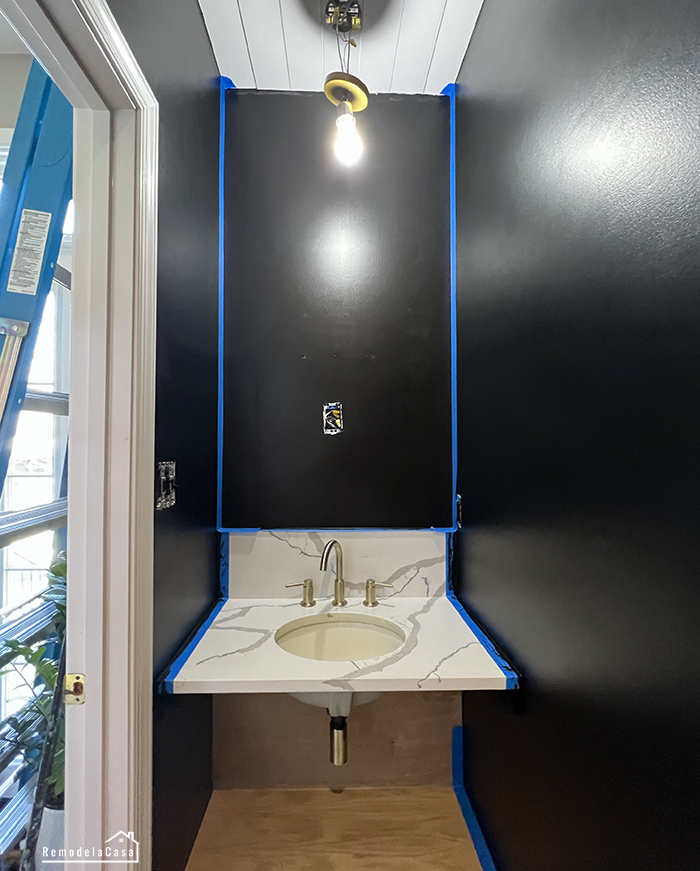
That's something I learned during the makeover of my powder room, where I decided to give the small room a shiny black treatment in Sherwin-Williams Tricorn Black, satin finish.

Yes, I'm here, passing on plenty of lessons if you ever decide to give one of your rooms a gorgeous, glossy black finish.
I compiled all that learning experience into these five basic tips you can use to ensure success!
*This post contains affiliate links for your convenience. Click here to read my full disclosure policy.
1. PATCH AND REPAIR HOLES AND WALL IMPERFECTIONS
The first step you have to take when painting a room black is to go around the room and mark every imperfection on the walls, then fix them!
Black walls are very unforgiving of imperfections. Every mark or drywall chip will show up in the final coat, making it difficult to touch up or paint over.
Popped Nails
I had a multitude of popped nails that I had to remove. The nails were replaced with screws, and then the area was patched.

Patch every single chip and hole on the walls.

2. FEATHER THOSE PATCHED EDGES
Feathering drywall is a technique that uses the angle at which you maneuver the blade of a drywall knife to avoid leaving a thick edge on the compound you just applied. Those patched edges need to have a smooth transition onto the drywall.
Feathering is an easy concept, but it definitely takes some time and lots of practice to master.

I'm still a rookie at this wall-patching business. I failed miserably at patching so many areas in this little bathroom.
I had to go three times, and even more, over the same area to make it as seamless as possible. Remember that we are preparing the wall for a final, unforgiving, shiny, dark coat. ;)
Sand & Clean
If the feathering goes right, you'll have a very smooth surface that would only need light sanding and dusting to get it ready for paint.
3. EVEN OUT THE TEXTURE ON THE DRYWALL
When patching painted drywall, you end up with an area that is smoother than the rest of the painted drywall, as shown in the picture above.
The difference in texture will be carried even after the final coat is applied and will be noticeable, not in a good way. You need to address that issue now.
Wall Texture Spray
You can use a wall texture spray if you're patching a few holes or a small area. Make sure you shake the container well enough and practice your spraying pattern on a cardboard or practice surface before working on your walls.
You can also adjust the spray nozzle to deliver the texture at fine, medium, or heavy consistency. You should work with a fine coat and build it up.

Use The Proper Roller Nap
When you're dealing with many smooth patches throughout the room, as I was, your best bet is to address the texture difference by applying the primer with the appropriate roller nap.
That number represents the nap height, the thickness of the fibers that extend from the roller backing and carry the paint onto the walls. 3/16" or 1/4" would give you a smooth painted surface. While a higher nap, 3/4" or 1", is ideal for painted textured plaster, stucco, etc.

Select a nap height that matches the texture of the painted wall. Apply at least 2 coats of primer to the wall to even out the texture on all surfaces.
Apply the first coat of primer and wait 24 hours before applying the second coat to give the product ample time to cure.
I used a 1/2" nap height for my walls, giving them two coats of primer. In hindsight, I should've given them one more coat.
4. PRIME THE WALLS
Primers cover imperfections on the walls, hide stains, and prevent them from bleeding through the new paint. They give you a blank canvas where the paint will hold its own.
When working with patched or repaired drywall, it is imperative to use a coat or two of good-quality primer to prepare the wall for the topcoat.
I used white Kilz 2 Latex primer because I already had it. If you're going from white to black, as I did, I recommend getting a dark gray primer. It will bring the color closer to that of the final coat, perhaps lowering the number of topcoats you need to apply.

As stated in the previous tip, use the nap height that perfectly matches the texture on most of your painted surfaces.
5. PAINT
I used a 1/4" roller nap height for the topcoat application.


Check this powder room's complete makeover right HERE.

If you did a good drywall prep work, once you're done applying that first coat of black paint, you will see an overall smooth finish. You just need to wait for the paint to dry before applying the next coat. Give it a third coat if the coverage isn't that great, and you're DONE!
On the contrary, if you did a lousy job prepping those walls for paint, you need to go back to step one and repeat every step to ensure a smooth, glossy black final coat.
Oh my goodness, I failed miserably at patching those holes. I need to go back to feathering school to get all the tricks and hacks to ensure a smooth transition from one side to the other.
This area, where we removed the previous light, was the worst. Perhaps the light shining directly on it was the main culprit.
Every single imperfection was showing!

The patched nail holes on the main wall weren't any better. I had to do lots more sanding.
Also, be aware that shiny black walls are difficult to touch up or paint over. Yep. I also tried to do that.
I went over a small area with a roller loaded with paint. Well, once it dried, that area was all my eyes could pay attention to. It created a big black patch on the wall. The solution was to paint the entire wall one more time.

I noticed a difference in texture from the patched sections to the rest of the walls. That's precisely why I said I should've given it another coat of primer.
Even though the painting of this room was full of learning mistakes, I'm pleased with the final outcome, and I'm more than ready to tackle any other black room that comes my way.


Check out all the projects tackled in this powder room makeover!
*This post contains affiliate links.

Thanks for sharing these tips with us. Sometimes bloggers make it look like everything works out perfect when it doesn't. Thanks for being so transparent with us. It helps to know what to expect and that not everything will be magazine worthy up close.
ReplyDeleteBTW, I love how your bathroom came out. Looks gorgeous!
All those mistakes along the way are a great learning opportunity. It sucks when you're in the middle of that, but they make us better crafters.
DeleteI always say that my projects are far from perfect. By showing up those mistakes I hope that you can avoid them or be more prepared when dealing with the same situation.
Thanks so much for stopping by and for your kind message!
Patching sheetrock is tough...sadly I have become a master at it the last few years! One suggestion...after you have sanded SUPER smooth but before texture, take a damp sponge or cloth and wipe the edges of the mud...this helps get a good "feather" by removing new mud and revealing the original texture and gives you a seamless "transition" line. Try to get as close as you can to the patch without actually getting on the patch...let it dry and then lightly hit it again with sand paper. The sanded patch MUST be super smooth before you add texture or you will see the whole mess!!!
ReplyDeleteI needed you here! 😅 All that practice turned you into a pro in this field! Oh and I knew about that damp sponge tip, but guess what? I completely forgot to put it into practice. 🤦🏻♀️
DeleteThe black looks fantastic in this little powder room! Mudding and patching are a long process for me and not my favorite diy job. You learned and learned again, and the room looks great! Ciao, Bella!
ReplyDeleteThanks Guerrina!! I'm right there with you, one of my least favorite jobs.
Delete