Bringing organization to the garage always comes with a project or a few DIY projects in the mix. This is how this little step stool came to life. Who can resist this beautiful pile of wood! :D
Yes, this little step stool can be done with those pieces from the scrap pile. Pretty much a free project that you can enjoy for years to come.
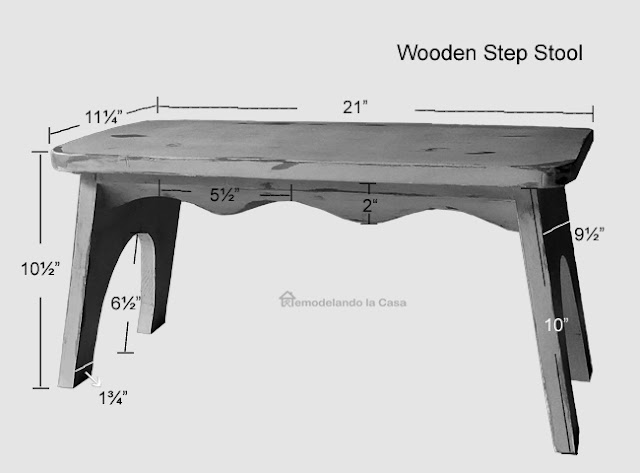
These are the dimensions for this step tool.
Besides paint, the vintage look came with the addition of the scalloped apron. That piece came off from a hutch I transformed long time ago - details here.
Since I built this step stool with repurposed materials, I'm not going to give you a detailed tutorial. I'm giving you lots of details besides the measurements, a great way to replicate any project -IMO. ;)
Cut the top board to size and round the corners. Set aside.
 |
| | Miter Saw | |
Draw the design on the legs, and using a Jig Saw, cut it out.
The scalloped apron trim was also cut on a 10° with the shortest point at 16¾".
The connecting pieces were attached with glue and pocket hole joinery. Their outer side has to be cut at an angle too.
 |
| | Ryobi Drill | |
Almost done.
Time to add the top board.
-Place the top board right side down. Center the stool base on it and trace all around it's perimeter.
-Take away the base and make the predrills on the top board for where the screws will be driven.
-Flip the top board and countersink each of those holes.
-Finally, set the top board on the stool base and drive the screws from the top down.
After caulking and sanding, this is how the little step looked.
Yep, ready for paint.
I first gave it a coat of ASCP - Graphite.
Then, I used a mix of ASCP - Florence and Duck Egg Blue as a top coat, but Vaseline was used to give it that distressed, old feel.
After the first coat of paint is dry, rub Vaseline on those areas that get more wear, or are more likely to get chipped, like corners and edges. Apply the top coat, let it dry fully, then using a piece of cloth, clean the Vaseline off the wood.
I sealed the entire stool with clear and dark wax.
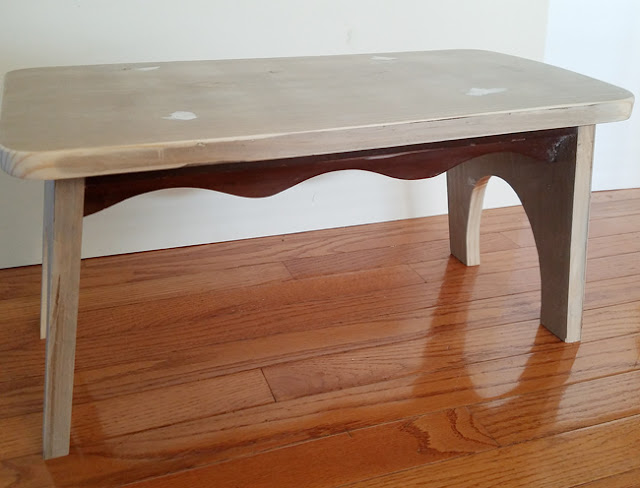
And here, is my little "Vintage step stool". :)
Don't you love step stools? They remind me of my grandmother, she used to have two that she used all the time.
Well, this is not my first step stool and for sure, it's not going to be the last one... I still have plenty of material to build me some more! :)
For more DIY ideas check these out:


How cute! You SO inspire me to make things!
ReplyDeleteBrenda
Thanks so much Brenda! It's good to know that. :)
DeleteGreat little stool, I like how you used the scalloped piece.
ReplyDeleteThanks Julie! I finally used that piece, and hey, I still have another one from the same hutch. I'm thinking on building a little shelf with that scalloped piece as crown.
DeleteI love it, what a great little stool.
ReplyDeleteI think they're good anywhere in the house. Thanks for stopping by Marty!
DeleteThis is adorable! I don't understand how you used the Vaseline though?
ReplyDelete~Sheila
Making the Most of Every Day
Thanks Sheila! You apply the first coat of paint, in my case the dark color. Once dry, using your fingers, you apply Vaseline to the edges and anywhere you want a distressed look. Paint it again with the top color, in my case the blue/green. Allow the paint to dry and then go with a rag over the areas that have Vaseline. All those areas are going to show your first color.
DeleteBeautiful as always!
ReplyDeleteThanks so much, Liz!
DeleteNice work! The stool is beautiful ♥
ReplyDeletesummerdaisycottage.blogspot.com
It is so pretty! Super job!
ReplyDeleteYour stool is not only gorgeous, your instructions are excellent and easy to understand. We would love for you to link up this DIY post and others each week to our new Monday Social linky party that is still live on my blog. I pinned this to my Pinterest board, Fall. http://botanicbleu.blogspot.com/2016/09/monday-social-1a.html
ReplyDeleteJudith