
Update your powder room with a DIY modern floating vanity.
I'm back with another project tackled in this little powder room: The Vanity.
The previous project in this room was about the ceiling treatment; you can check that post right HERE.


As you can see in the picture below, this little bathroom sported a pedestal sink. Yep. This sink had been here for more than 20 years. I like pedestal sinks, but after many years with the same configuration, I was ready for a change. The feature I like the least about pedestal sinks is the lack of storage or a counter around them.
I wanted my new vanity and countertop to be a focal point in this room. I wanted a stone counter, and given that this is a small area/vanity, I was OK with splurging on quality material.
That's precisely one of the beauties of renovating a tiny space.
Let's take a look at how this floating vanity was built. I promised you that this is a straightforward DIY!


*This post contains affiliate links for your convenience. Click here to read my full disclosure policy.

THE TOP
Before we dig into building the vanity, let's talk about the countertop. I wanted the top to be the focal point of the vanity and bathroom.
I headed to my local stone go-to place here in the DC area: Architecture Stones, aiming to get a beautiful marble or granite slab for this bathroom vanity.
If you want to go that same route, let me give you a few tips before you start perusing all those gorgeous slabs:
- Before removing your old vanity setup, take measurements of that setup. How far from the wall is the faucet? Is it centered? How high is the sink or the old vanity?
- Determine the size of your new top.
- Buy a sink that fits your countertop's size properly.
- Buy a faucet.
- Sketch your new top and mark the sink location. How many inches from the front edge of the countertop do you want your sink to be?
- Where do you want your faucet? Centered? How far from the back do you like the faucet installed? If the faucet has separate handles for cold and hot water, how far apart do you want them?
- Bring the new sink and faucet with you when you visit the stone fabricator.
I did have the sink and the faucet with me when I went to buy the top, but I wasn't prepared with most of those measurements. I thought they just knew it. Nope. Well, maybe they know, but that's your project. You can ask for almost anything, and they'll do it for you.
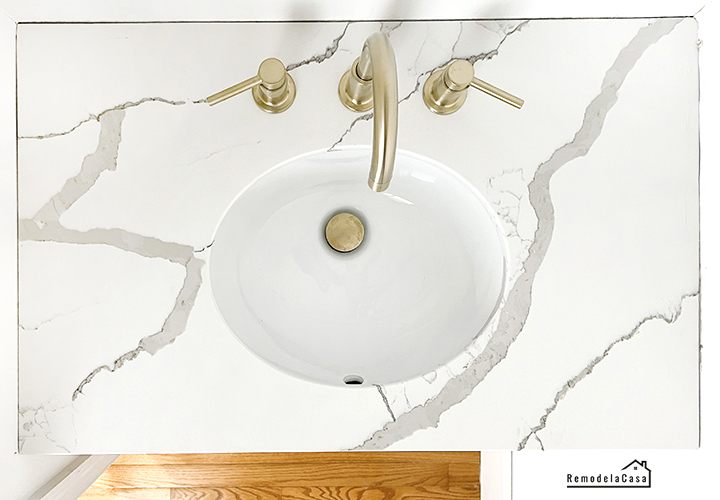
I got my sink centered across the top. The distance from the front edge to the beginning of the sink is three inches.
The space between the hot water handle/faucet/cold water handle is 4 inches each.
The distance from the back to where I wanted the faucet installed is two inches. I was glad I took that measurement and had the picture you see below on my phone. However, I also had to consider the backsplash's width.
Remember that they accommodate your needs. If you need your counter cut in a weird shape, they'll do that for you!

I forgot to take a picture of the plain top with the sink installed, since that's how they gave it to me when I picked it up.
The picture below was taken after it was installed in the bathroom.

| Sink |
Let's now build a floating vanity that complements this gorgeous top!
The Materials You'll Need:
- Vanity top - I used a Quartz Veria Calacatta Laza
- Sink
- Faucet
- Sink P-Trap
- 2'x8' 3/4"-White Oak Plywood
- 1- 2x4x8
The tools:
1. MEASURE & MARK
The first step is to measure and mark the height at which you want to install the countertop.
Remember that the standard height for a bathroom vanity is 30-32 inches above the floor. Lately, there's been a trend toward higher vanities, up to 36 inches, or customized to a homeowner's preference.
I added two inches to the old setup, bringing our new vanity height to 34".

2. FIND & MARK STUDS LOCATION
Draw a level line on the wall at your designated vanity height.
Then, use a stud finder to locate the studs on the wall. Mark their location.

| Laser Level | Stud Finder |
3. INSTALL A WOODEN CLEAT
A wooden cleat, cut from solid 2 x 4 lumber, supported the heavy top along the back and sides.
Don't forget to consider the slab's thickness when installing the cleat.
Make sure you drive the long screws into the wall studs.
I used 3-1/2" screws - two on each stud, and I did pre-drills.

| Drill |
On the left side of my installation, I used a couple of toggle bolts to secure it because I couldn't locate any regular studs in the wall.
| Toggle Bolts |
4. MOUNT THE TOP & CONNECT THE WATER SUPPLY TO THE SINK
With proper support in place, the next step was to install the top and connect the water supply. I left this part of the job to the pros.
I was asked if I wanted those pipes brought inside the wall, but I declined for two reasons. First, the installation price would have been double, and second, that back wall is an exterior wall. I don't want to worry about pipes freezing in the winter.
I was happy to have a working vanity with a beautiful Veria Calacatta quartz top and a shiny high-arch faucet! But yeah, that bottom part wasn't pretty.

Shelf supports cut from 1x2 lumber were installed on both facing walls above the baseboards.

5. INSTALL A FLOATING SHELF
I needed to create a false back wall to help conceal those pipes. The first step was adding 2 x 4 stoppers to install the baseboard.

The location of the pipes was transferred onto the white oak plywood shelf and cut out using a jigsaw.

A 2-1/2" mitered plywood front gives the shelf that clean, chunky look that I love!

6. INSTALL A FALSE BACK
Some more pipe concealing was necessary. I used a 1/4" plywood piece cut to fit that back area. Again, I notched out the area for the drainpipe, and 2x4 supports were installed at the corners.
NOTE: This board will be removable; I'm using Command Strips to attach it.

7. ADD THE FRONT APRON
The final part is to add the pretty apron.
The gorgeous white oak grain is a statement in itself. I love how this bathroom is starting to look!

Let me tell you that I haven't added a single nail to this entire vanity. It fits so snugly that it stays in place without any. :)
I need to remove everything to paint those walls. I've been patching them, but they're now ready for the paint treatment.

Oh, and I also need to install the backsplash, but you'll see that in an upcoming post!

I always like it when people add dimensions to their projects. Even if my project is not exactly like theirs, it's easier for me to think about it when I have those dimensions.
Here are the ones for this little vanity:
Size of counter: 32" x 20" x 1-1/4" thick.
Front apron: 32" x 8" x 3/4"
Shelf: 32" x 15" x 2-1/2" - Height from floor to top of shelf: 11"
I hope this can be helpful for you, too!
For all the projects going on in this bathroom, check these out:
DIY - PLANKED CEILING
FLOATING SHELVES MAKEOVER
THE BEFORE - POWDER ROOM

*This post contains affiliate links.

Looks awesome and I love the construction method you used ! Powder rooms are so much fun to makeover because the are small and every detail is so impactful!
ReplyDeleteThanks Beck! You're so right, these little rooms can withstand lots of decor choices.
DeleteWow! this is exactly what I am trying to do in my half-bath and really appreciate all the details with pictures and dimensions. Finding the quartz countertop and sink is a major challenge but with the info you provided, I have new confidence I can make this happen! I have been a long time subscriber and have been collecting your ideas to use in my own house upgrades someday. I wish you continued success!
ReplyDeleteMaria B.
Hi Maria! Thanks so much for your kind comment and for sticking with me for all these years! ❤️ I understand you when you say it's a major challenge, as I used to feel the same way.
DeleteYou have to pay attention to all the measurements when ordering your sink. I first bought one from Home Depot but had to return it because it was too wide (front to back). For the countertop, the stone fabricators are usually very helpful, you just need to know what is it that you want.
For this type of counter, you're going to be looking at remnant pieces, which are sold at lower prices.
Good luck with your bath and all those projects in the making!
Hello again,
ReplyDeleteI'm confused by the gold p-trap you used. Is the old (pvc) p-trap still in use and hidden behind the vertical wood board? Did the plumber use the gold piece only to connect the sink drain to the existing p-trap?
Thanks, Maria B.
Hi Maria, No. The old PVC trap was discarded. Since I was going for a modern bath design, I wanted to use that contemporary style p-trap in a gold finish. Somehow the plumber couldn't match all the parts that came with the trap. In the end, he had to use the parts that came with the sink (black PVC) to connect them.
DeleteI didn't bother because I knew that part was going to be hidden with the front apron.
Now, he had to bring that main pipe coming from the wall a few inches higher for this new trap.