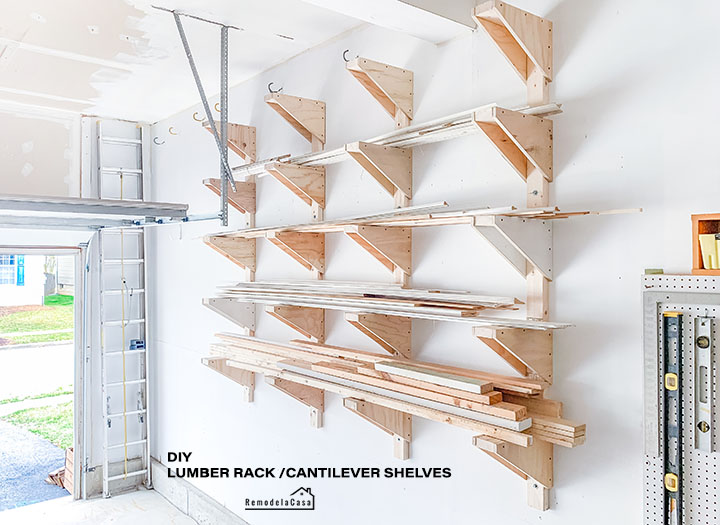
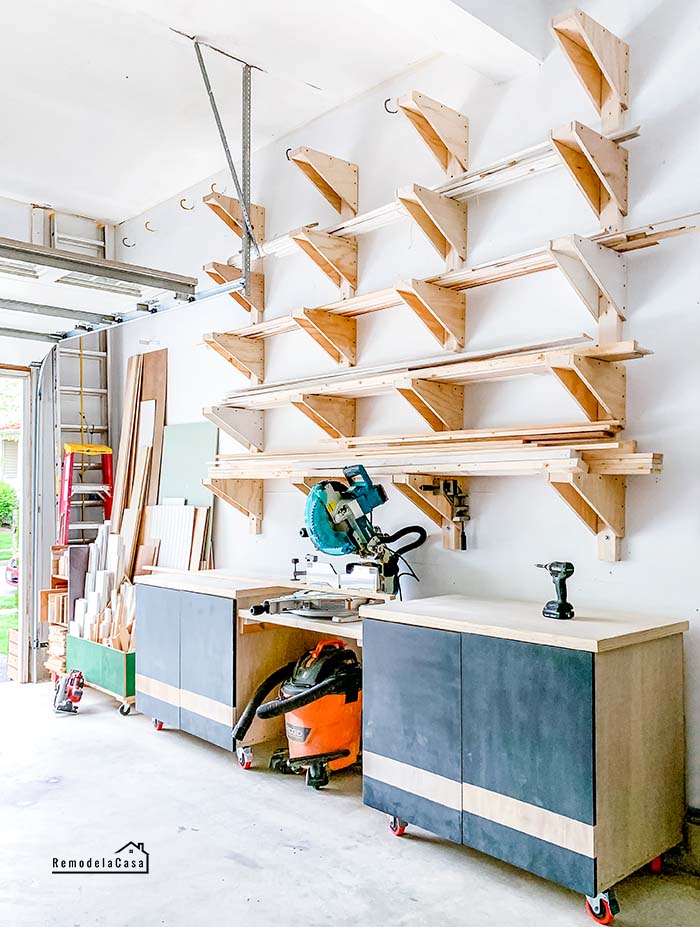
Welcome back to the garage makeover series! If you've been following along, you know the struggle has been real. It feels like I spent an entire month just clearing the floor space you see in the photos. It was a tough job, but I finally cleared enough room to tackle a major pain point: lumber storage.
I decided to build a set of DIY cantilever shelves (also known as a wall-mounted lumber rack).
Before this project, my workshop had two massive problems:
No dedicated station for my heavy-duty bench tools.
Zero organization for long lumber.
I had wood scattered everywhere—under the workbench, leaning against every wall, and tucked into random corners. It was a mess! (If you want to see the "shameful" before photos, check out my previous post right HERE.
The Plan & Inspiration
To get started, I cleared the wall completely and gave it two fresh coats of paint.
I owe a huge thank you to my friend Julie and Sandra from SawDust Girl, whose incredible workshop projects inspired this build.
*This post contains affiliate links for your convenience. Click here to read my full disclosure policy.
Materials & Tools You'll Need
To make this rack sturdy enough to hold heavy hardwoods and 2x4s, quality hardware is key.
Materials
Vertical Wall Supports: (4) 2x4s (I used 9-foot lengths)
Bracket Centers: (20) 2x4s cut to 13-1/2"
Bracket Sides: 3/4" Plywood (I used 10 rectangles cut to 15" x 12")
Hardware: * (16) 3/8" x 4" Hex Zinc Plated Lag Screws
(16) Flat Washers
Drywall screws (#6 x 1-5/8")
Recommended Tools
Measuring & Leveling: Tape measure, Stud finder, Level
Cutting: Circular saw (or Miter/Table saw)
Driving: Milwaukee Impact Driver & 1/2" Impact Wrench
Drilling: 5/16" Drill bit (for pre-drilling lag screws)
Extras: #14 Socket, Clamps
Let's build this lumber rack!
Here's a quick video of the entire project:
Step-by-Step Instructions
1. FIND AND MARK THE STUDS
The most critical step is locating your wall studs. These supports will carry a massive amount of weight, so you must anchor them directly into the framing.
2. SET A LEVEL LINE
My garage floor has a significant slant, and the walls are 12 feet high. To keep everything accessible but off the floor, I started my shelving unit 3 feet up. I mounted a temporary 2x4 horizontal "ledger" board using 3" screws to act as a shelf for the vertical supports during installation.
3. PREP THE VERTICAL SUPPORTS
I cut my vertical 2x4s to 9 feet and marked four screw locations on each, starting at 4 inches from each end. I pre-drilled the holes using a 5/16" bit.
Pro Tip: I used the Milwaukee Cobalt drill bits. They are designed for stainless steel, so they sliced through this wood like butter and stayed incredibly sharp.
Even with the temporary horizontal support, this is a two-person job! I had my husband help hold the 9-foot boards while I aligned them with the studs.
We drove the top and bottom lag screws first.
I used a Milwaukee Impact Wrench to drive the hex lag screws. It made the job effortless—heavy-duty tools are worth it when you want the machine to do the hard work for you!
- Note: I used a #14 socket from a mechanics toolset. Don't think those sets are just for cars; they are essential for home maintenance and furniture assembly too!
I used 3/4" plywood scraps for the bracket sides.
1. Cut 15" x 12" rectangles.
2. Draw a diagonal line 1-1/2" from opposite ends to create the "arm" shape. Cut along that line.
3. Sandwich a 2x4 block between two pieces of plywood.4. Flush the pieces toward the front, use a temporary 2x4 spacer at the back, and clamp them.5. Secure everything with three 1-5/8" screws on each side.
Decide on your shelf heights based on what you store. Attach the brackets to your vertical supports using three 1-5/8" screws per side. Ensure every bracket is level across the entire rack so your lumber stays flat and doesn't warp!
The Results: A Transformed Workshop
My "day project" turned into a night project, but seeing the lumber finally off the floor was worth it.
And here, the following day.
The Update: The wood is finally organized! I put my heavy 2x4s on the lower, more accessible shelves. The upper shelves are perfect for thin moldings and trim I don't use as often.
I even built a miter saw station directly underneath the rack, which fits perfectly.
And as a bonus? I found a "just right" spot for my long ladder to hang vertically.
It feels so good to see an almost empty garage floor!
Here again, the three main tools that rocked this project:
 |
| | 1/2 in. Impact Wrench Kit | Cobalt Drill Bit Set | 1/2 in. Mechanics Tool Set | |
I acknowledge that The Home Depot is partnering with me to participate in the promotional program described above (the "Program"). As a part of the Program, I am receiving compensation in the form of products and services, for the purpose of promoting The Home Depot. All expressed opinions and experiences are my own words. My post complies with the Word Of Mouth Marketing Association (WOMMA) Ethics Code and applicable Federal Trade Commission guidelines.


Awesome looking! I don't have a garage, but will keep in mind for basement once it's cleaned out!
ReplyDeleteThanks Guerrina! This would work in the basement too. I also built a nice storage shelf for my basement that has worked really nicely there, you can see that project right here: https://www.remodelandolacasa.com/2018/02/bsmtshl.html
DeleteThank you for the post! You've inspired my next garage remodeling project!
ReplyDeleteReally cool projects. I need to make some cantilever shelves too. My garage is a mess. Well done!
ReplyDeleteI don't understand these ????? How do you use them?
ReplyDeleteRon, I just went and updated this post with the final pictures of those brackets serving their purpose: Holding lumber!
DeleteThanks for your comment. Yep. All empty it's hard to figure it out.