

This post is sponsored by The Home Depot.
My last post about the mini-makeover in this room focused on the wall design. You can check that post right here. Today, I'm giving you all the details about the desk, the built-in desk.
As I stated in the previous post, I've been using this room, the original dining room, as my office. Although I kept a table as a desk, it also doubles as a dining table when having guests.
The built-in bench was the only item that was working for us in this configuration. I loved how it looked, but my kids didn't enjoy that bench for long. They felt trapped there. :D
*This post contains affiliate links for your convenience. Click here to read my full disclosure policy.

It's so easy to remove stuff you've built. You know how everything was put in place.

This is a long space for a long desk. Total dimensions: 70" x 5-3/4" x 18-3/4" Deep
You can find the desk plans right HERE, which were my exact dimensions.
More than likely, your dimensions differ, but this is an easy build and can be used as a guide.
1. BUILDING THE COUNTERTOP
The materials I used:
I had to continue with the same design for the counter I built for the shelves on each side of this space. I also used the same 1-1/2" top thickness. The other reason for that chunky top is strength. Something that long might begin sagging in no time if it's made with 3/4" material.
The first step was to drill 3/4" pocket holes on one side of one 1 x 10 x 6'

My RIDGID Combo Kit with Hammer Drill & Impact Driver was the tool for this project.
Add glue to the edge of both 1 x 10s, clamp them side by side, and secure them together by driving 1-1/4" Kreg screws.

It's now time to put the plywood and pine, the top board, together.
1. BUILDING THE COUNTERTOP
The materials I used:
- 2 - 1 x 10 @ 6 feet long pine boards
- 1 - 6' x 20" - 3/4" plywood
- 2 - 1 x 2 @ 6 feet long pine boards
- 1-1/4" Pocket hole screws
- 2-1/2" Pocket hole screws
- 1-1/4" wood screws
- 3-1/2 wood screws
- 1-1/2" brad nails
- Wood glue
I had to continue with the same design for the counter I built for the shelves on each side of this space. I also used the same 1-1/2" top thickness. The other reason for that chunky top is strength. Something that long might begin sagging in no time if it's made with 3/4" material.
The first step was to drill 3/4" pocket holes on one side of one 1 x 10 x 6'
Add glue to the edge of both 1 x 10s, clamp them side by side, and secure them together by driving 1-1/4" Kreg screws.
Apply wood glue to both surfaces and drive plenty of 1-1/4" wood screws on the plywood side.

Not shown: Glue the 1 x 2 x 6 to one long rough side., That's going to be the front edge of your countertop. Drive a few 1-1/2" brad nails for a stronghold.
Trim to size with a circular saw, then drill 1-1/2 pocket holes on both sides to attach it to the shelves.
Trim to size with a circular saw, then drill 1-1/2 pocket holes on both sides to attach it to the shelves.
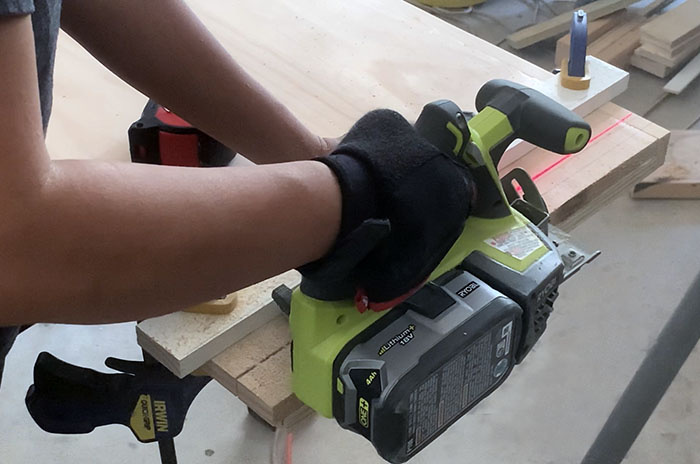 |
| Ryobi Circular Saw |
Install the remaining 1 x 2 along the wall, driving 3-1/2" wood screws onto the studs on the wall.
The last step with the counter is to dry fit it.

2. BUILDING THE DESK'S BASE
The materials I used:
- 2 - 1 x 3 @ 8 feet long pine boards
- 1 - 1 x 4 @ 6 feet long pine board
- 1-1/4" pocket screws
- Wood glue
For the desk's base, I used 1 x 3 material instead of a single piece of plywood to keep the structure light and prevent sagging.
3/4" pocket holes were used for its entire construction.

I decided to build the drawers first.

3. BUILDING THE DRAWERS
The materials I used:
The drawers are a simple box that I put together with pocket holes on the front and brad nails on the back.
3. BUILDING THE DRAWERS
The materials I used:
- 1 - 1 x 4 @ 6' long pine board. (trimmed at 3-1/4") for the front of the drawers.
- 1/2" plywood was used for the sides and back of drawers - 3-1/4"
- 1/4" plywood was used for the bottom of the drawers.
- 1-1/4 pocket hole screws
- 1-1/4" brad nails
- wood glue
The drawers are a simple box that I put together with pocket holes on the front and brad nails on the back.
The only new part to me was making the grooves that hold the bottom, using the table saw.
 |
| DeWalt Table Saw |
You can skip this part and simply attach the bottom to each drawer with screws.

I built them mostly from 1/2-inch plywood and didn't use drawer slides because, again, I didn't want them to weigh too much.

Once the drawers were all done, I proceeded with the installation.

This part was tricky because I didn't have much space to fit the drill in.
Thankfully, this DeWalt 90-degree drill attachment saved the day.

The same thing happened with this Ridgid Multi-Tool I used to open a hole to bring the cables onto the bookcase.
Don't you love multi-tools? They're the tool you grab to get you out of trouble. This is not only a multi-tool but also a system that lets you change the head to easily swap out accessories.

 |
| | Drill | Hole Saw | |
4. FINISHING THE DESKTOP
One coat of Varathane White Wash wood stain was applied with a brush. After a couple of minutes, I wiped off the surface with a rag.
Once dry, it was sanded, and two coats of spray satin poly were applied to protect the wood.

Like most of my projects, this is not perfect. As you can see here, the gap between the drawers is not consistent, but guess what?
It works, and that's what matters most to me.

I need to add drawer stoppers and pulls; there are so many choices that it's hard to pick just one.
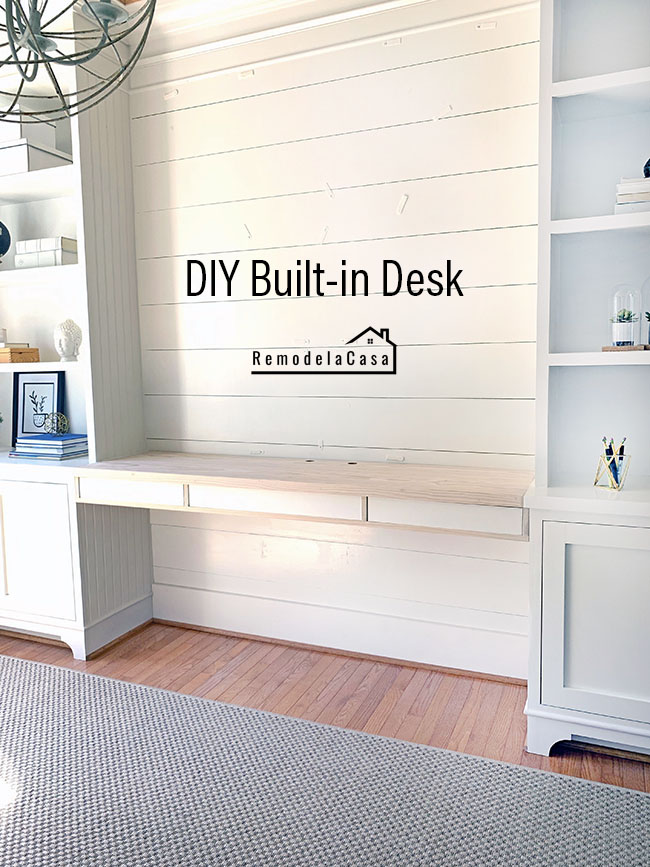

Here again are some final pictures with the wall design in place.


And here are some of the tools that made this build possible:


I acknowledge that The Home Depot is partnering with me to participate in the promotional program described above (the "Program"). As a part of the Program, I am receiving compensation in the form of products and services, for the purpose of promoting The Home Depot. All expressed opinions and experiences are my own words. My post complies with the Word Of Mouth Marketing Association (WOMMA) Ethics Code and applicable Federal Trade Commission guidelines.

And here are some of the tools that made this build possible:

 |
| DEWALT 33 in. Folding Portable Workbench DEWALT MAX FIT Right Angle Magnetic Attachment Kreg Jig Master System |

I acknowledge that The Home Depot is partnering with me to participate in the promotional program described above (the "Program"). As a part of the Program, I am receiving compensation in the form of products and services, for the purpose of promoting The Home Depot. All expressed opinions and experiences are my own words. My post complies with the Word Of Mouth Marketing Association (WOMMA) Ethics Code and applicable Federal Trade Commission guidelines.
*This post contains affiliate links.

Cristina,
ReplyDeleteYour desk is another outstanding DIY in your home. The wall design makes the whole area eye-catching.
Judith
Where are the wires? How do you keep everything so clean underneath?
ReplyDeleteThe top is wider/deeper than the box of drawers. I used that extra space in the back to suspend the cables from the countertop, bringing them to the outlets inside the base cabinets.
DeleteLove this! What bookshelves are you using?
ReplyDeleteThanks Brittany! The bookshelves are also a DIY project that you can check here: https://bit.ly/3qcmQpB
Delete