

One project that I'm working on required me to go beyond my backyard to the wooden area and grab my material, yes, tree branches of different thicknesses. They laid on the garage floor for some weeks until I was ready to cut them.

For the project, I needed the cuts to be 6" long. I began with the thinnest branches and had no trouble cutting them with the miter saw. It was very easy when the branches were straight, the twisted or curved ones were harder to hold and the saw kicked back when trying to cut through some of them.
It was time and I think is always a good idea to CLAMP THE WOOD! The small clamps I had were fine holding the thin branches.

For the thick branches, I didn't take risks! The hand saw was my tool.

The material was cut and it was ready to come inside the house.

But first, it went into the oven to kill any insects that they might have. There are no great instructions out there on how to do this, some people freeze the wood, and some others warm it up!
I read somewhere, to place them in the oven at 110° - 130° F for six hours. I was going to follow those instructions, but Alas! my oven doesn't take 110° or 130° degrees! It begins warming up at 170°F! So, that's the temperature I used for four hours since I had to crank it up.


While they are ready, let me show you some amazing projects from around the web with branches and logs and cuttings from them!
Birch-Log Coffee Table
 |
| Better Homes and Gardens |
Natural Wood Statement Necklace
 |
| The Scrap Shoppe Blog |
Wall Art
 |
| Better Homes and Gardens |
Tree Branch Table
 |
| Man Made Diy |
Wood Round Wall Tutorial
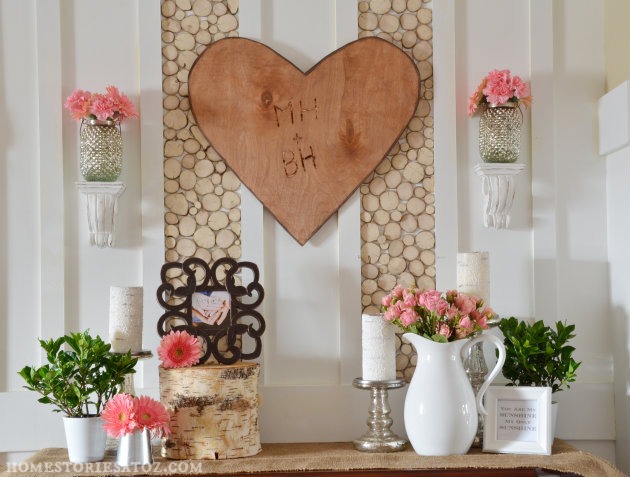 |
| Home Stories A to Z |

So many cool ideas, I love the wood accesories, I would love to have some large rounds to use for chargers, they are just a little pricy, but I will continue to check...love the table with wheels, wow that is so cool...
ReplyDeleteCan't wait to see.
ReplyDeletelooks interesting...in a good way
ReplyDeleteOh I can't wait to see what your creative self is going to do with the cuttings!!!
ReplyDeleteWhat fun- We used to make drawings on these when we were kids. Love that table in the right setting- xo Diana
ReplyDeleteWhat amazing ideas! I can't wait to see what you create! :)
ReplyDeleteI am so looking forward to see what you are going to make! It will be interesting to see if what I imagine you are going to make will be what you actually create! What a great trick on how to get rid of the creepy crawlers!!
ReplyDeleteHappy Easter!
Jemma
Very very cool! I can not wait to see what you are going to do! And thanks for the tip on warming the wood to get rid of creatures, that is good to know!
ReplyDeleteI would have never thought of frying the little critters in the oven. I might have to do this with pinecones in the fall. I can't wait to see what you're up to!
ReplyDeleteQue buenas ideas . Yo siempre aprendo de ti y estoy ansiosa por ver que harás con esos troncos
ReplyDeleteMuchos cariños
Oh I CANNOT wait to see what your project will be. Such cute ideas.
ReplyDeleteI have a log in my yard that's been sitting there since the hurricane. Thank you for sharing some inspiration because I know I want to use it for something but I was scratching my head on what. Coming over from Between Naps on the Porch and your newest follower!
ReplyDeleteJeanine
Cannot wait to see what you do! I know it will be beautiful.
ReplyDeleteThose are lovely! I can't wait to see your project. I've never heard of putting the wood in the oven to kill insects - great tip!
ReplyDeleteOh, my, Cristina! This is a beautiful idea! Please, come link this post to my party! Love it!
ReplyDeleteThese are all such clever ideas. I'm sure your creation will be fabulous.
ReplyDeleteLove all these projects Cristina! I can't wait to see what you come up with, wondering if it's going to your masters bedrooms renovation?! :-)
ReplyDeleteI had the same issue with my oven until I discovered I could press and hold the 'bake' and/or 'roast' button and after about 5 seconds it offers 100 for raising dough or 140 for dehydrating!
ReplyDeleteSo clever. I've been burning all our extra wood in the fireplace vs drying it out in the oven. Now I must pay attention to what you come up with.
ReplyDeleteDropping by from BNOP, Jane
Cool! I'm excited to see what you do with them! Little Bit from www.DecorateWithaLittleBit.com
ReplyDeleteCristina, I love this post. I have a pile of Christmas tree ends I've been collecting to one day do "something" with them. Over the past couple of years ideas have been coming my way. I look forward to seeing what you are doing.
ReplyDeleteLiz
Love the wood tables and I can't wait to see your finished project. I am a new follower so I won't miss it.
ReplyDeleteThanks for sharing, Ginger
I love anything from the outdoors. I like all of the ideas you shared.
ReplyDeleteThanks for sharing.
Michele
Fantastic tutorial and LOVE the finished project which will be featured in a few :). Thanks for linking to my mantel!
ReplyDeleteI had no idea you had to "bake" the wood, but I understand why. Wouldn't want any uninvited critters to show up! Those are all really neat ideas. I can't wait to see what you came up with. I'm itching to jump ahead, but will take everything in order so I don't miss anything!!
ReplyDeleteDebbie
I've been dreaming of some great wood projects like those, loved the inspiration!
ReplyDelete