On my daughter's long list of wishes for her room, she wanted a window seat or bench to sit and gaze while listening to music or completing her homework.
Those little minds have enormous ideas, and as a dutiful momma, I wanted to grant those wishes.
It is a small room, but a bench all along the window wall would be a wonderful architectural feature to add to it.
*This post contains affiliate links for your convenience. Click here to read my full disclosure policy.
After getting rid of the pink walls, the curtains, valances, and the window sills...
The following illustrations will show you how the bench was created.
The windows are not centered on that wall.
The dresser had to stay.
Pieces of 1x2 were attached to the wall, as shown, to help support the bench top.
5 Vertical supports were then screwed to the floor.
The vertical supports are pieces of 3/4" plywood surrounded by mitered pieces of 1x2, leaving open spaces for the 1x2 boards on the wall and the baseboard to run freely.
Once ready, they were screwed to the floor on both sides as shown.
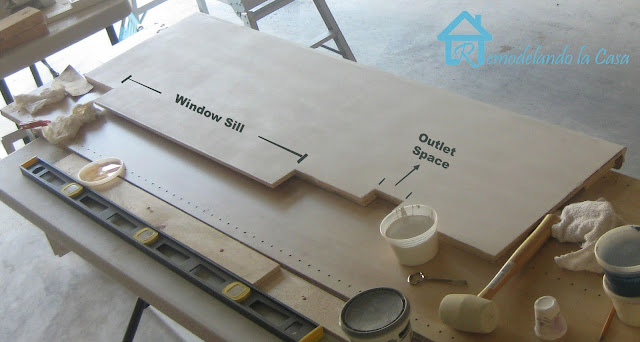
The bench top had to follow the contour of the wall. My bench tops had a protruding entrance that works as a window sill.
I also had to cut an opening on each top because there were electrical outlets that I wanted to keep from relocating.
Two pieces of plywood were attached underneath the top board to give it extra strength.
Two pieces of plywood were attached underneath the top board to give it extra strength.
Decorative molding finished the front edge.
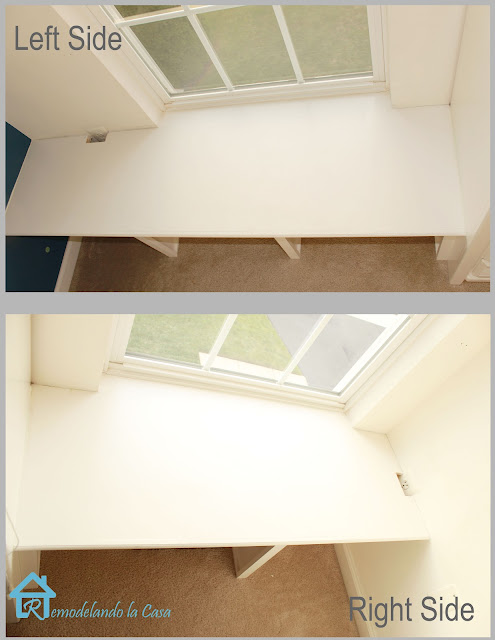
Once everything was sanded, caulked, and painted, this is how it looks.
Once everything was sanded, caulked, and painted, this is how it looks.
The openings for the electrical outlets worked out really nicely. This spot is where my daughter sits to listen to her music without worrying about running out of battery or having cables tangled on the front of the bench.
The dresser was updated with the same paint color as the benches and new hardware.
The benches are not attached to the dresser. If I want the dresser out, it goes out.
New cushions, curtains, pillows,
and the customized wicker baskets make this her favorite spot in her room.
She got rid of the pink room, but she will never be ready to let go of her favorite doll, Samantha Parkington; the doll will always be by her side :)
For more DIY home decor ideas, check these out:


Cristina, you are so talented. Love the window seat. Your daughter's room looks so nice. I bet she loves her new room.
ReplyDeleteI love window benches. You did a great job adding them to your daughter's room! Love the colors that you're using in there.
ReplyDeleteOh, Christina, the benches are gorgeous! You are so very talented! I love the colors you used in her room. The cushions are just beautiful! Great, great job on this project!
ReplyDeleteWhat a beautiful project, Cristina! I love the cushions and the colors are just perfect for this room. Megan
ReplyDeleteGorgeous!
ReplyDeleteThis is fantastic, what a great project!!
ReplyDeleteyou are just a building machine my friend!!! Love how you did the built-ins
ReplyDeleteBeautiful, you are so talented! Thanks for the directions and inspiration!
ReplyDeleteThis looks great! The built-in look just takes this room up to eleven. I love the window treatments and cornice board too. Well done!
ReplyDeleteThis is an amazing transformation! I love the window seats! I remember wanting them when I was young too. Her room looks great! I love the new colors and the baskets are great storage and so cute!
ReplyDeleteWow! Great window benches!
ReplyDeleteTotally, totally awesome! Great work!
ReplyDelete--Katie
Wonderful tutorial on building window seating! Love, love, love it! Visiting from Coastal Charm, Angela
ReplyDeleteA amazing! I love your graphic tutorials...what program do you use if you don't mind me asking?
ReplyDeleteChristina,
ReplyDeleteWill you write all my tutorials for me? Please. You are the best and this project is amazing.
I totally pinned it!
blessings,
karianne
Such a beautifully done project - you are quite a talented lady. And what a great use of that space as well!
ReplyDeletethat is amazing! i want that in MY room!
ReplyDeleteThis is incredible! I am soooo impressed. I am eyeing that bench seat and hoping you'll have a tutorial because I tried to make one a few months ago and failed miserably.
ReplyDeleteThanks Girls!
ReplyDeleteto Beth, the graphs are done in Photoshop. I love that program, there are other programs that I think are better for me to do that, but I need to learn them first!
Wow! It all looks so custom and built in! It looks fabulous!
ReplyDeleteThis is a beautiful window seat, Christina, and I love the striped green and blue fabric you used for the cushion and curtain detail--very pretty!
ReplyDeleteYou certainly know what you are doing - it looks perfect!
ReplyDeleteThe room looks amazing. You did a wonderful job to make the window seat work with the existing wall space and furniture.
ReplyDeleteWhat a cozy space! Beautiful work!
ReplyDeleteHello, new follower here! I would love to have you link up with my Clever Chicks Blog Hop this week!
http://www.the-chicken-chick.com/2012/09/clever-chicks-blog-hop-2-featured-post.html
I hope to see you there!
Cheers!
Kathy
The Chicken Chick
I have always wanted a window seat in my room, What a lucky little girl! And I still have my American Girl too, I'll never let Samantha go!
ReplyDeleteStacia@ http://feathersandsunshine.blogspot.com
I love the window seat. Your cushion looks amazing! Great choice of colors, too!
ReplyDeleteAmazing! I Love it!
ReplyDeleteBench topsThat's amazing,looking so beautiful,really i love this,i also want to like this,thanks for sharing.
ReplyDeleteAlways good to visit! Clever use of space
ReplyDeleteCristina, I love the bench. Nice job and great tutorial!
ReplyDeleteAwesome! Thanks for the great tutorial too! Looks beautiful!
ReplyDeleteLeslie
House on the Way
What a wonderful spot you've created for your daughter - sweet and functional too!
ReplyDeleteThis blog is very well written and I appreciate your efforts.. Keep up the good work.
ReplyDeleteBeautiful job and great tutorial! If you haven’t already, I hope you’ll visit "One Creative Weekend" on OneCreativeMommy.com (open every Fri-Wed) and link up this idea and anything else you’d like to share. There are two categories—one for Halloween and one for everything else.
ReplyDeleteWow! This turned out awesome! Great job.
ReplyDeleteabsolutely fabulous! love how you kept the dresser in but left the option to take it out. not surprised at all it's the favorite spot in her room!
ReplyDeleteThis is a fabulous tutorial! I love your blog Cristina! I am pinning for future reference! Thanks for the sweet comment on my desk!
ReplyDeleteWe love what you have done. Please come share it with us at http://obsessiveandcreative.blogspot.com Craft Frenzy Friday! The party starts Thursday to 7pm cst. I won't be a party without you!
ReplyDeleteThis looks likes like such a nice cozy spot for a girl to hang out. You really did a fabulous job!
ReplyDeleteQuite informative and the interesting blog for everyone, I simply loved it.
ReplyDeletebubblegum casting reviews
Your place is for definite couturier bookmarking.
ReplyDeletebubblegum casting reviews
I believe this is actually the most useful blog I've been through this entire day.green coffee extract
ReplyDeleteI believe this is actually the most useful blog I've been through this entire day.
ReplyDeleteincrease pagerank
Congrats you individuals are doing with this blog site.
ReplyDeleteHow to lose stomach fat
easy online advance jacksonville fl
ReplyDeleteThe problem is that you provide may be worth our time and also effort.
phone lookup service
ReplyDeleteIt’s really such nice information to get advantage from.
Thanks for this colossal information, pleasant read!
ReplyDeletevitiligo cover up makeup
This is amazing supportive of me to have a website, that’s so valuable for my awareness. Thanks
ReplyDeletebestcitation.com
Wow, what a great blog this is! Truly lovely quality stuff, the lesson given in this is pretty informative.
ReplyDeletebest electric shaver reviews
Nobody can reject the info you have given in the blogs, this is actually a great work.i live in new york and i need a payday loan
ReplyDeleteInteresting site ,want to get another similar site just visit here
ReplyDeleteThanks meant for sharing this type of satisfying opinion, written piece is fastidious, that’s why I’ve read it completely.clash of clans triche astuce
ReplyDeleteI sent your articles links to all my contacts and they all adore it including me.tennessee online payday advance
ReplyDeleteGood blog along with the excellent quality stuff and I’m sure this will be greatly helpful.payy loans waco tx
ReplyDeleteIt sounds like fabulous!! I have been affectionate of your blog, I’ll come again to visit more posts. Dr Robi
ReplyDelete