
A plain honey oak kitchen gets a good amount of style and elegance by adding moldings to its cabinets.

It was about time to give this kitchen a good amount of beauty!
That’s my word for moldings: BEAUTY.
Before I get into all the little details about the moldings, let me do a little recap.
*This post contains affiliate links for your convenience. Click here to read my full disclosure policy.
The honey oak kitchen that you see in the picture below was our command center for more than 10 years. It was already showing the signs of the use and abuse that we inflicted upon it, so yeah, this was the starting point to a full kitchen makeover.
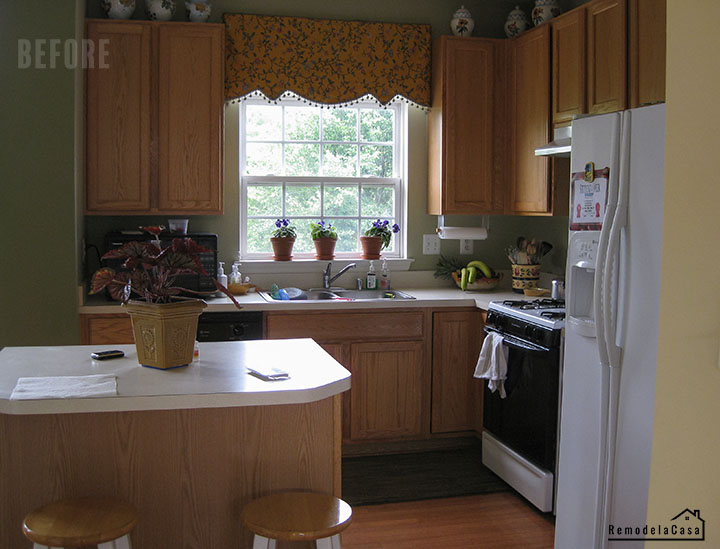
The kitchen island was the first project to be tackled off the list.
Then, a refrigerator enclosure was built to somehow try to hide that big elephant in the room.
The next step in this kitchen makeover was building and installing a range hood, and soon after the space above the cabinets was closed in.
Yep. No more dusting that space up there.
Nothing fancy huh.

This kitchen now needed moldings to make it look expensive!
Adding moldings to your kitchen cabinets is a great way to customize your kitchen on a very low budget.
The moldings that I used are these:
Let's take a look at how these moldings were used. By the way, they were all found at our local Home Depot.
1. MOLDING USED AT THE BOTTOM OF THE CABINETS
I made the molding myself by getting a wall molding and on the back of it, a long piece of 1/2" x 3/4" pine molding was attached (picture below).
Both pieces were glued and nailed together. Then, they were cut as needed (mitering the corners).
They were attached to the bottom of the cabinets using brand nails.
They were attached to the bottom of the cabinets using brand nails.


2. MOLDING USED AROUND THE BASE OF THE RANGE HOOD
The molding used on the base of the range hood was a base cap with a simple profile. Mirroring its placement on the top and bottom of that base.


3. MOLDING USED TO CLOSE THE GAP AT THE TOP OF THE CABINETS

Once in place, it looked like this, second horizontal molding from top to bottom:

4. MOLDING INSTALLED ON MDF TOP PANEL
Another piece of molding was also installed a little bit higher than the one before. That wall molding is the same that was used on the bottom of the cabinets. It was nailed to the top MDF board that was used to cover the space above the cabinets. This molding helps to visually break that big empty space (first molding from the top, above picture).
5. SIDE OF CABINET MOLDINGS
On the side of the cabinets overlooking the window, lattice molding ¼" x 2" was installed to give those cabinet sides the look of “recessed” panels.

6. CROWN MOLDING
The crown molding was the last one to be installed. I think this is the one molding that gave those cabinets a full punch of style!
Have trouble installing crown molding?
Check an easy way on how to cut crown corners right HERE.
Once all the trim was installed, this is how my little kitchen looked. 😍😍
Do you see potential??
Yes, I do!

At this point, it was just waiting for caulking to fill gaps and holes, and then, sanding and painting everything.
7. TRIMMING THE RANGE HOOD
I used half-round molding as a decorative detail on the front of the range hood. It was glued in place after everything was painted.

You can check the complete details on how to paint the kitchen cabinets right HERE.
Let's check those final pics when everything was said and done!

The cabinets with the lower molding on them...

The refrigerator enclosure...

And the range hood.

PIN IT!

Here's how the kitchen looked with a new roman shade treatment. ❤️

Once again, here are all the links to all the work done to this kitchen:
how to paint the cabinets.
Install a marble backsplash.
Close the space above the kitchen cabinets
Build a range hood.
Build a fridge enclosure.
Update the kitchen island
Tips about installing recessed lights
Final kitchen reveal
Kitchen cost breakdown
1 ½ Year Later How the Kitchen is Holding up
Build-in Plate Rack
Pull Out Shelves in Pantry
LG Appliances Review and Complain
*This post contains affiliate links.

Wow! Gorgeous!
ReplyDeletemuy bonita!
ReplyDeleteI am loving your tutorials on how to do such beautiful additions!
ReplyDeleteThank you!
Lee Ann
Your work is very beautiful, a lot of great ideas.
ReplyDeleteI am working on my kitchen and I think I will combine some of your ideas from the kitchen and laundry room.
I will also check out that lumber store, I guess I live in the same region than you!
Did you also buy your plywood there?
Christina,
ReplyDeleteI remember your kitchen from back in January and now that I've crossed paths with it again at Addicted 2 Decorating's party, I had to pin this idea. I have the exact same dust gathering issues above my cabinets. This is going on my to do list!
Thanks for the great tutorials!
:)
Linda
It is beautiful! Pinning it1
ReplyDeleteThis took so much patience and attention to detail. It's just beautiful. I saw your link at Savvy Southern Style. Glad I stopped by!
ReplyDeleteYou have the best posts! What a huge difference moldings make to plain cabinets!
ReplyDeleteGreat instructions!!!!
What a transformation that adding molding makes! Thank you for the wonderful tutorial ... I'm taking notes! Beautiful kitchen!
ReplyDeleteThat looks AMAZING!! I am completely wowed!!!
ReplyDeleteI love your kitchen. You did a terrific job of updating it.
ReplyDeleteThat trim just makes it all look so rich.
ReplyDeleteWow sweet Christina, you are so talented, can get over how beautiful you turn everything you touch into! The moldings are the icing on the cake, just gorgeous!
ReplyDeleteFABBY
Gorgeous! I'm pinning this because I'd love to add some molding to the bottom of our cabinets. Great job!
ReplyDeleteI'm a new follower. I hope you'll stop by my blog!
You did an incredible job! I am so impressed. We just got finished with a big remodel as well. I still need to have the molding put around the kitchen window. I would love to see a close up of how you did that area. I know I will be spending more time on your blog!! It is great.
ReplyDeleteThanks everyone for all your kind comments!
ReplyDeleteTo Just Spiff It, installing molding around a window is a post I need to do in the near future. btw you have a no-reply e-mail address.
Really impressed! Everything is very, very clear, open is a description of the problem. It contains the information.
ReplyDeleteWhat an excellent tutorial. Really helped me with moldings to choose for closing in my cabinets. Thank you!!!
ReplyDeleteI'm a sucker for any post that includes a diagram and it looks like you making a ton of progress with your projects. this is a good one, exactly similar to a pro install and one that many kitchens could benefit from. well done Christina.
ReplyDeleteI love your curtain. What is the fabric - Did you make it or buy it? Your home is such an inspiration!!
ReplyDeleteThanks Katie! The fabric is Waverly- Pom Pom Play Spa. You can check how it was done here: http://www.remodelandolacasa.com/2013/10/give-your-roman-shades-new-look.html
DeleteFantastic renovation!!!! We are going to do pretty much the same- paint oak builder grade cabinets and install molding. Also, marble backslash (love the one you choose), hopefully, will be doing the same hood cover. We are not DIY, unfortunately, and will hire a contractor to do all that. Will use your posts to show our contractor how it should look like! Thank you for all step-by step postings!
ReplyDeleteThat's so right, Slavalera, you're doing pretty much the same! Thanks for stopping by! I would love to see the before and after of your kitchen reno, very exciting! Good luck with it!
ReplyDeleteI love your kitchen and can't wait for my builder grade kitchen to look like that! I had a oak wall in my family room that I stained gray and covered with a white wax and that was a really cool treatment, but I'm going to stick with white for the kitchen! Thanks for the inspiration!
ReplyDeletewww.mommystoolbelt.com
Terrific how you show all the steps and then at the end, all the molding types on one page. We're redoing our kitchen and want to paint some cabinets and leave some oak and the best way to tie in is to do what you've done above the cabinets. Thanks again
ReplyDeleteThanks Kathy! Two-tone kitchen cabinets are the rage right now. I would love to see how you work them out!
DeleteCristina,
ReplyDeleteLove your cabinets! I want to spiff up my plain cabinet doors by adding 1/4"x1/2" trim molding, such as you did on your range hood, but I can't find it anywhere in that size. Help, please!
Gini
Thanks Gini! Have you tried a lumber yard? That's where I buy most of my moldings, and they're slightly cheaper than at the big box stores.
DeleteHi Cristina, did you router the inside of the 1/4"x1/2" trim molding placed on the cabinets that are on either side of the sink or add small moldings? I assume the 1/4"x1/2" trim was put on before the trim on bottom of cabinet? kitchen looks great.
ReplyDeleteNo, Kevin, I didn't even have a router at that time. I added lattice ¼" x 2" around the perimeter of the cabinets (sides), it was also done to even out the lip from the front face of the cabinets. I did it backwards, I first installed the trim on the bottom of all the cabinets (leaving it ¼"outside on those sides), and then glued and nailed the lattice in place.
ReplyDeleteOoops Kevin, I just read your comment again and yeah, I did use a very small molding around the perimeter of the cabinets(sides), along side the lattice. It's a tiny molding you have to cut it by hand.
DeleteThanks for the replay, glad my eyes weren't playing tricks on me. One other question regarding the same area if you don't mind. Is your "stile" nearer the cabinet front wider than the one near the wall when you take into consideration the side frame of the cabinet? I was thinking of filling in the seam where the stile meets the cabinet and make the other trim around the perimeter match the width of the stile touching the front of the cabinet. so width would be the width of the stile plus cabinet face frame side
DeleteYou have sharp eyes! :) And yes, you're right and RIGHT! That stile is narrower than the one closest to the frame. The way you're thinking on doing it it's the right way to go about it. I didn't have the tools at the time to cut those long skinny pieces of wood. I would love to see your work!
DeleteCristina, my cabinets were professionally sprayed. I do have the oil based paint they used for touch-ups. Could I add molding at this point and just use the paint they gave me?
ReplyDeleteI would say yes, though I've never done this.
DeleteI am going to do exactly this to my cabinets. I have a 12" gap to the ceiling I need to fill up. Is this too big a gap? How big was yours?
ReplyDeleteI had a 12" gap too.
Deletevery very nice .want ask how can i put wood good on wall
ReplyDeleteWhat paint did you use? It looks like a nice finish.
ReplyDeleteI used Benjamin Moore Aura - Satin finish - Navajo white
DeleteLooks beautiful! Where did you get the window valance?
ReplyDelete