
What better way to dive into Spring than creating a little garden. An easy succulent garden to enjoy in the comforts of your own home.
Happy Spring, friends!
I went shopping with Pilar, my SIL, and we were on our merry way when she spotted an Aldi Store.
Oh, boy!
Going grocery shopping is something I do when my refrigerator is almost empty, and if I can skip it, I surely do it. :D
She loves those Aldi stores. Her saying is, "I always find excellent finds and prices in there." :)
We got cookies and spreads, and before heading to the cashiers, we stopped by the home section. Right there, she spotted this cross-base shallow bowl. The price displayed on the shelf was $4.99.
Whoa, that was a great find!
We each got a bowl, paid for them, and checked the receipts on our way to our car... The bowl's price was $19.99. 😳
We returned to check, and these big bowls had been placed in the wrong spot. The $19.99 price for each bowl was still pretty reasonable, so we kept both bowls.
*This post contains affiliate links for your convenience. Click here to read my full discl sure policy.

Besides, I already knew how that bowl was going to serve me!
Yep. It was turned into a succulent garden. 🌵
I've been postponing dividing this succulent zebra plant or Haworthia succulent for over a year. I love all those little marks it possesses.
The problem with this girl is that she keeps on giving me offsets. I transplanted two plantlets already, but as you can see, she grew another batch.

There are three main ways to propagate Haworthia:
- Leaf cuttings: This is the most common and relatively easy method. Simply remove a leaf from a healthy plant and allow the cut end to dry for a few days. Then, place the leaf onto a well-draining potting mix and keep it in a bright, indirect light. The leaf will eventually produce roots, and a new plant will grow.
- Seeds: Haworthia seeds are tiny and can be difficult to germinate. However, you can successfully propagate Haworthia from seed with patience and care. First, soak the seeds in water for 24 hour. Then, sow them in a well-draining potting mix and keep them in a warm, bright place. The seeds should germinate within a few weeks.
- Offsets: Haworthia often produces offsets, which are tiny plants that grow from the base of the mother plant. To propagate Haworthia from offsets, simply remove one of the offsets from the mother plant and plant it in a well-draining potting mix. The offset will eventually grow into a new plant
How to propagate your Haworthia succulent from offsets and plant in a shallow container:
Succulents do well in shallow containers that you keep indoors, especially those succulents that grow slowly like this Haworthias and don't spread much.
Since we're planting small offsets, utilizing a shallow container makes it even more suitable.
The materials you'll need:
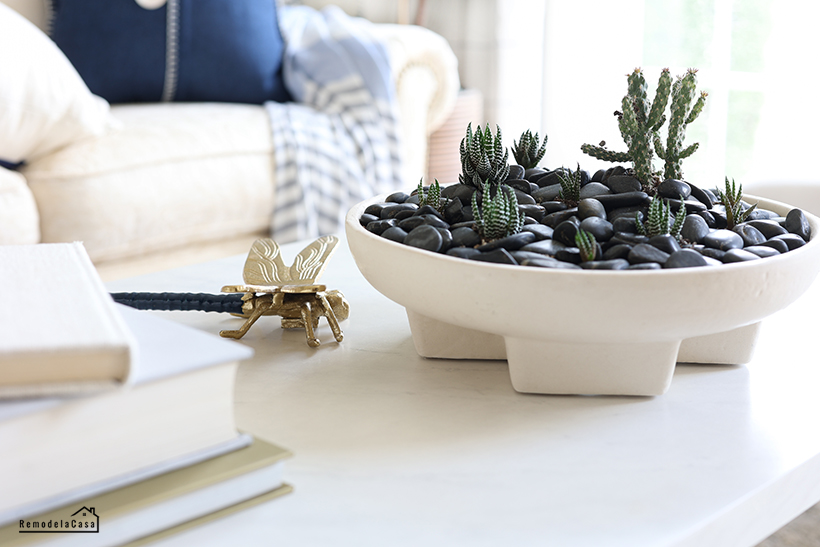
Shallow Bowl (The one I used is 12" x 2-1/2" deep)
Gloves

The ideal bowl would have at least one draining hole. Two or three would be better on the bottom of the bowl to let excess water out.
If you get a bowl like mine, without draining holes, you can drill holes into it. If you don't want to drill holes, you can add a layer of pebbles and charcoal at the bottom of the bowl to improve drainage and prevent the roots from rotting.
There is not much room for drainage layers when working with a shallow bowl. I didn't add anything other than the potting mix soil.
My plan is to water sparingly and in small amounts.

The first succulent I planted was a mini-cholla cacti that I bought to give more height to the garden. It was placed slightly off-center.
Then, the two zebra plants I had transplanted a year ago.

The next part was to remove the plantlets that had sprung up alongside the mother plant.
Grabbing each little offset from the base, I wiggled it and gently pulled it to set it free.

One by one, they were removed and planted. Each one is wholly formed and with its own roots.

In total, there were eight plantlets alongside that mama. This means that I planted 10 zebra plants and one cacti. 😊
I couldn't find white pebbles to cover the soil. Instead, I used small black rocks that I already had.
It is advisable not to water the garden right after planting it. Wait a day or so to water, and do it sparingly.

Having a brand new succulent garden prompted me to arrange the coffee table in the living room.

These succulents are drought tolerant, which is precisely what works for me.
Sometimes I feel bad for not watering them sooner, but they always thrive even with that type of neglect.

I love the cactus. Let's hope it thrives in this little garden.


I can't wait to witness all that growth that will happen here!

Have you divided or propagated succulents? Any advice?
Whichever method you choose, propagating Hawortia is a relatively straightforward process that anyone can enjoy. With some care, you can easily propagate Haworthia and enjoy new plants for your home.
I checked for similar bowls, and the closer ones I found were these ones:

*This post contains affiliate links.

Love the black rocks! Used them with my olive tree…so “rich” looking!!!!
ReplyDeleteWell, I'm now glad I couldn't find the white pebbles! :) You're right. The black ones have more character.
Deletefantastic.. ....... ..... ... ... ... ...
ReplyDeleteThank you so much, Lisa!
DeletePlanting a succulent garden in a shallow bowl is a creative way to showcase these hardy and low-maintenance plants, adding a touch of natural beauty to your home decor. garden hose
ReplyDelete