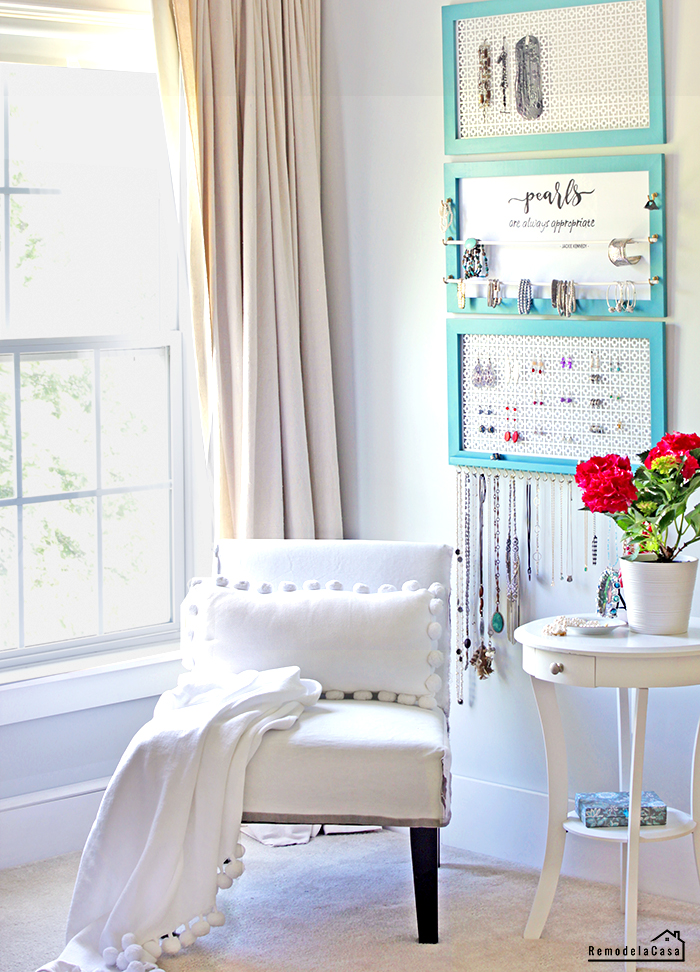
This DIY jewelry organizer is a cute and fairly easy project that you can create this weekend and have ready for mother's day.
*This post contains affiliate links for your convenience. Click here to read my full disclosure policy.
Creating a Jewelry Organizer like the one in the picture below is one of the many workshops you can take at the Home Depot. This time, they asked a group of bloggers, including me, to make our very own version of this same project and today I'm revealing what I came up with.
I always love to see the many different ideas for the same project, and this post it's exactly that, you can find the links to the other Jewelry organizers at the end of this post.
This is an easy project, that you can make your own, whether by customizing its final decorating style or by making it more intricate depending on the tools you want to use to create it.
Let's take a look at what I created using these poplar boards and copper sheets that I found on sale at the Home Depot!
Ha, I bought a whole bunch of those copper sheets, I'm sure they're going to be pretty useful for coming projects.
The tools & materials you'll need:
- 12in. x 24in. copper Aluminum sheet
- ½in. x 2in. x 48in. S4S poplar boards
- Router
- Rabbeting bit
- Miter saw or Miter Box
- Stapler
- Brad nailer
- Push points
- 1" cup hooks
- Sawtooth hangers
- Wood Glue
- Painting or staining materials
So, let me show you the twist I gave to my Jewelry Organizer:
The first step I took for creating the frames was to cut rabbets all along one side of the poplar boards, I was going for a regular picture frame look.
Note: As I said before, you can use the tools you have. I used a router, but that's not necessary. During the workshop, simple tools are always used.
 |
| | Ryobi ONE+ Trim Router | Rabbeting Bit | |
I decided to put my new Ryobi Trim router to good use, and I have to tell you that I LOVED it! It's so light and easy to use, and it's always great not having those pesky cords in the way.
The depth was set at 1/8in. and the guide was also set for the cut to be at ¼in. from the edge.
The depth was set at 1/8in. and the guide was also set for the cut to be at ¼in. from the edge.
 |
| | RYOBI Miter Saw | |
Wood glue, 1¼" brad nails, and staples kept those corners looking good and strong.
After sanding and dusting the frames, I applied two coats of Rust-Oleum Vintage Teal spray paint on them. The copper sheets were also spray painted.
After sanding and dusting the frames, I applied two coats of Rust-Oleum Vintage Teal spray paint on them. The copper sheets were also spray painted.
 |
| Glazier's Steel Push Points |
Once the copper sheets and frames had dried, they were put together using push points.
Sawtooth hangers were also added.
Sawtooth hangers were also added.
One of my frames got a different treatment: A duck cloth with a sign on it.
Instead of one, I created a set of three.
 |
| | Pearls... Sign | transfer paper | |
I couldn't agree more with Mrs. Jackie Kennedy's words: Pearls are always appropriate.
I created that little sign that I transferred onto fabric. You can download it here.
 |
| Brass-Plated Cup Hooks |
One extra little shelf with tons of hooks for lots of storage. ;)
This is a project you can totally customize to your own likes and needs.
This set of jewelry organizers is keeping that corner of my bedroom looking pretty. ;) Hey, I need to go jewelry shopping!
This is a project you can totally customize to your own likes and needs.
This set of jewelry organizers is keeping that corner of my bedroom looking pretty. ;) Hey, I need to go jewelry shopping!
Now, let's see all the awesome jewelry organizers that my blogging friends created!
*I acknowledge that The Home Depot is partnering with me to participate in this Workshops Program. As a part of the Program, I am receiving compensation in the form of products and services, for the purpose of promoting The Home Depot. All expressed opinions and experiences are my own words. My post complies with the Word Of Mouth Marketing Association (WOMMA) Ethics Code and applicable Federal Trade Commision guidelines.*
*This post contains Affiliate Links for your convenience.*


Cristina, I love it! Your quote and the little shelf is perfection. :)
ReplyDeleteThanks Laura! I also love the touch of glam you added to yours. <3
DeleteLove the teal and the ledge you added for your rings!
ReplyDeleteThanks MaryAnn! I'm still hooked at that color after what? four years! I wonder what's gonna be the next.
DeleteThanks for stopping by!
What a pretty way to display your jewels!
ReplyDeleteAww, thanks Sheila! It was a necessity. I'm so happy to have it!
DeleteOMG! THAT is exactly what i need! This is the perfect set and looks amazing! But I think I can't do it by myself, I don't have all the instruments you have :( Why don't you start selling sets like this?
ReplyDeleteErika the leather cleaning expert
This is beautiful! I have been looking for something to make my jewelry studio/office pretty! I love the colors! Thank you for sharing!
ReplyDelete