
This post is sponsored by The Home Depot.

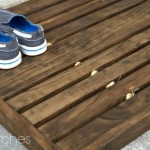
Nothing like a brand new rug by your front door to welcome the new season! This time I'm welcoming Spring with a fresh and vibrant "leaves" rug!
A wooden rug that you can make this weekend, and here I have all the details for you. ;)
This is a project done for the Home Depot's DIY Workshops. At the end of this post, you'll find the links to visit each and every one of the fellow bloggers who gave the same project - the wooden door mat- their own spin. You're going to get inspired to create your own, that's for sure.
 *This post contains affiliate links for your convenience. Click here to read my full disclosure policy.
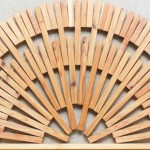
THE MATERIALS FOR A 30½" x 18" Wooden Mat:

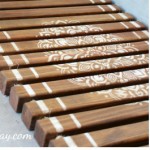
Sand those boards, especially the rough ends.

Mark 2 inches from both ends of each board; that's where you'll drill the holes.
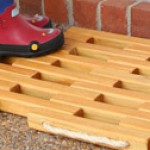
I clamped each piece on its side, to scrap wood (see picture below), and drilled the holes. First, using a 1/8" bit, then with the 1/4".
Since this is one-inch material, you have to be very precise while drilling these holes. Take your time and go straight.

You can simply apply the stain and thread the cord, and you're DONE!
The boards were primed, and two coats of Behr Marquee - Dove White - Semi-Gloss were applied.

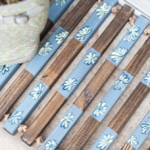
Once the white paint is dry, you can draw your leaf design very lightly with a pencil. I first drew my design on paper and used it as a visual guide to transfer it onto the boards.
Two coats of Behr Marquee - Dried Chive - Semi Gloss were used to paint the leaves.
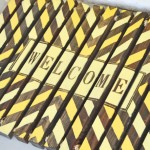
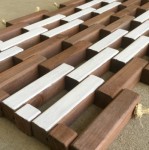
As you can see in the picture below, the mat boards were kept together by clamping two extra boards on each end. A little paint seeped between some of the boards. A quick touch-up was done.

They all looked so good with just paint, but to preserve the finish even more, I gave all the boards three coats of flat-finish poly.

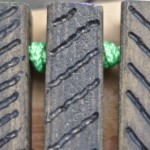
The final step was to pass the nylon cord through the holes and add a hex nut between the boards to keep a consistent spacing.
Did you notice I painted the hex nuts?


As I said, some gardening was thrown in the mix.
This is a project done for the Home Depot's DIY Workshops. At the end of this post, you'll find the links to visit each and every one of the fellow bloggers who gave the same project - the wooden door mat- their own spin. You're going to get inspired to create your own, that's for sure.
THE MATERIALS FOR A 30½" x 18" Wooden Mat:
- 18' 1x3's (You'll need 11 - 18" boards)
- 2 - 4' Diamond Braid Nylon Rope (¼")
- 20 - 5/16" stainless Hex Nut
- 4 - Flat washers
- Stain or paint to finish it.
INSTRUCTIONS:
Cut the 1x3 s at 18" long.
You can use a circular saw or even an old, regular hand saw. I did it the fastest way, using my Ryobi miter saw.

Sand those boards, especially the rough ends.

Mark 2 inches from both ends of each board; that's where you'll drill the holes.
I clamped each piece on its side, to scrap wood (see picture below), and drilled the holes. First, using a 1/8" bit, then with the 1/4".
Since this is one-inch material, you have to be very precise while drilling these holes. Take your time and go straight.

You can simply apply the stain and thread the cord, and you're DONE!
Ha, you know me. ;) I wanted something "Springy" to greet my visitors. That Springy idea was translated into painted leaves.
The boards were primed, and two coats of Behr Marquee - Dove White - Semi-Gloss were applied.

Once the white paint is dry, you can draw your leaf design very lightly with a pencil. I first drew my design on paper and used it as a visual guide to transfer it onto the boards.
Two coats of Behr Marquee - Dried Chive - Semi Gloss were used to paint the leaves.
As you can see in the picture below, the mat boards were kept together by clamping two extra boards on each end. A little paint seeped between some of the boards. A quick touch-up was done.

They all looked so good with just paint, but to preserve the finish even more, I gave all the boards three coats of flat-finish poly.

The final step was to pass the nylon cord through the holes and add a hex nut between the boards to keep a consistent spacing.
Little washers were added on the outside before tying the knots. Burning the ends of the nylon cord prevents it from fraying.

I LOVE it! It looks so fresh.
I LOVE it! It looks so fresh.
Did you notice I painted the hex nuts?
Yep, I'm that picky... 11 green, 9 whites. ;)

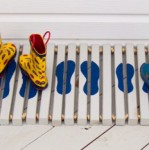
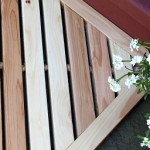
I was so glad to bring this mat to my front porch.

I was so glad to bring this mat to my front porch.
It was so sad and bare. I gave the whole area a good clean-up and even did some gardening.

That cupcake flower is the cutest!

While at The Home Depot, I also grabbed some herbs.
And hey, here comes a SURPRISE...


*I acknowledge that The Home Depot is partnering with me to participate in this Workshops Program. As a part of the Program, I am receiving compensation in the form of products and services, for the purpose of promoting The Home Depot. All expressed opinions and experiences are my own words. My post complies with the Word Of Mouth Marketing Association (WOMMA) Ethics Code and applicable Federal Trade Commision guidelines.*

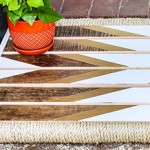
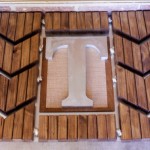
My wooden mat is TWO mats in one!

If I get tired of one design, or want to change it for the new season, I only need to turn it around and Voila! a new mat.


This is something YOU can TOTALLY DO!
For more inspiration, click on the links below to check the awesome
Wooden Door Mats
My blogging friends have created:
 |  |  |  |  |
 |  |  |  |  |
 |  |  |  |  |
 |  |  |  |  |
 |  |  |  |  |
The Home Depot offers Workshops at all of their locations for do-it-yourselfers of all ages and experience levels.
There are three types of Workshops offered: Do-It-Yourself (DIY), Do-It-Herself (DIY), and kids.
*I acknowledge that The Home Depot is partnering with me to participate in this Workshops Program. As a part of the Program, I am receiving compensation in the form of products and services, for the purpose of promoting The Home Depot. All expressed opinions and experiences are my own words. My post complies with the Word Of Mouth Marketing Association (WOMMA) Ethics Code and applicable Federal Trade Commision guidelines.*

Yours turned out so cute Cristina! I'm loving the spring weather and it makes me want to DO stuff! Next on my list is raised garden beds.
ReplyDelete~Sheila
Making the Most of Every Day
Thanks so much Sheila! That's the very same project I need to tackle next. My son is the one who has been pushing me to start the garden!
DeleteThis is awesome Cristina! Love that you made it reversible. Great idea!
ReplyDeleteThanks Karen! Kind of necessity, I don't want spring leaves during Christmas. :)
DeleteCristina it's gorgeous! So bright and vibrant, love the finish.
ReplyDeleteThanks so much Jaime!
DeleteI love the flat boards and the design you painted on it!!
ReplyDeleteThe flat boards were better for the painted design. Thanks for stopping by Ronda!
DeleteI love that it's reversible! Great idea to not add the knots! Perfect for spring!
ReplyDeleteI think the hex nuts gave it a sleek look. I love the colors you used on yours.
DeleteYes!!! Great minds indeed! ;) I Love your mat Cristina! You are awesome!
ReplyDeleteI love this SO much! It's fun and colorful and just screams "spring"! Way to go!
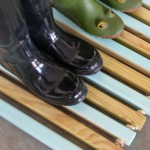
ReplyDeleteSo pretty!! I love the reservable look too! Also your yellow rain boots are awesome!
ReplyDeleteI love that you painted the hex nuts ;) I think you get the award for most perfect spring design! I love it against your door.
ReplyDeleteI need to make one of these for my back patio. And I liked how you painted this. I would love it if you would stop by Paintyourselfasmile.com and share at our Celebrate Your Story link party! Pinned! - Jenny
ReplyDeleteYour mat turned out so pretty Cristina!
ReplyDeleteI love this! Such a cheerful way to welcome guests to your home!
ReplyDeleteLovely! I want to do it! This weekend is my time! Thank you for the idea Cristi and amazing yellow boots by the way! :)
ReplyDeleteGreetings,
Jessie
Cleaning Services in Hammersmith
Your mat is so pretty, Cristina! Perfect for Spring!
ReplyDeleteI love that you can make it reversible because I like to change things out as the seasons change, but I dislike trying to find places to store multiples!
ReplyDeleteHey! Here's the talented girl at Blogland and as always you did great, wow, I love your mat and reversible it is genious! Loving the pic with the cute yellow rubber boots; I have ones in white.
ReplyDeleteYes, your son is right, I think you should start the garden, your son knows how talented and clever his mama is!
Hope you had a lovely Easter.
Abrazos amiga,
FABBY
Your wooden doormat is really gorgeous, Cristina. However, I think you are risking to damage the flower painting when turning the mat upside down. At least you put something on to protect it, this beautiful painting should not be facing the ground.
ReplyDelete.....
Beth Hughes,
Acton, Uk
Smart and talented gal, your door mat is fabulous. painting one design one side and different on other makes your hard work even more worth while. Having alternate is always good idea to keep mat idea fresh. Very well done. Have wonderful rest of week.
ReplyDeleteThis is one of the best Do it yourself projects I've seen. So cute. Versatile and individual. Thank you so much for sharing. I would love to try it.
ReplyDeleteAmazing door mat! Love it. Popping over from Jemma's today. Hugs and blessings, Cindy
ReplyDeleteYou did great job! The rubber boots are very cute!
ReplyDeletexo xo Bethany