

However, many homeowners don't want to hang curtains because they find the main components—the brackets and the rod—somewhat difficult to install. Well, I have a little secret to make that install go effortlessly.
I installed a blackout Roman shade in my son's room. I thought it was enough to keep the room dark when he wanted it dark. But it looked like nope. It wasn't enough. He kept complaining about the amount of light from the street lights during nighttime that came into his room through the sides of the Roman shade.
He kept pulling the shade to whatever side he wanted it on, and to make matters worse, he managed to pull the entire shade off the window.
I was busy with other significant projects around the house, but I asked the mister to go and re-install the Roman shade and hang the new curtain I had bought. Well, he went the easy road and only installed this:
 *This post contains affiliate links for your convenience. Click here to read my full disclosure policy.
I couldn't believe it!! 😠
Once all the markings were done, he could simply install the brackets, mount the rod, and hang the new curtains.
Well, as it happens to many people, he doesn't like installing those brackets. He usually damages the anchors or the wall where they need to be mounted.
Keeping that in mind, I'm here to tell you, as I told him, that installing those anchors is easy. I promise.
The secret: Do it slowly, use hand tools (although, if you're careful, you can use a drill) and be patient. That's it.
I won't bother telling you how to measure or how high those curtains need to be. I just want you to know how to install those brackets nicely.
1. Mark the location on the wall where those brackets need to be installed.
I usually trace the entire hole(s) area.
2. Use a nail and a hammer to find out if there's a stud right behind your mark on the wall
If both of your brackets have a stud behind where to mount them, you're the luckiest person on earth!
If only one of the brackets aligns with a stud on the wall, that's good, too. You only need to drive the screws onto the stud to mount that bracket. Driving the screws onto wood is the strongest way to mount those brackets. No need to add anchors.
However, if you don't have studs right where you made those markings, you need to add the anchors that came with the brackets.
The first step in installing the anchors, after knowing where to install them, is to make a little hole in the Sheetrock where you made that mark. You can use a nail and hammer, or you can use a drill with a drill bit. This is also a good way to know if there's a stud behind that wall. If the nail/bit is driven too easily, there's no stud.

3. Install the top anchor
The anchors are made of plastic, and they're fragile, and the Sheetrock is fragile, too. Here is where you need to go SLOWLY and use a screwdriver instead of a drill. The pilot hole you previously made is a good starting point. Continue driving the anchor, turning it clockwise with the screwdriver until it gets flush with the wall.
This is the part that my husband always had trouble with because he kept on using a drill. A few times, the anchor got damaged, but most of the time, the wall crumbled with the impact he gave it with the drill.
Remember that you can use a drill if you know how to operate it. For this type of work, you need to adjust it to deliver the least amount of power.

4. Install the bracket and mark the location for the second anchor
Bring your bracket on top of the already installed anchor and drive that top screw. Set it in place and then mark the spot where the lower anchor/screw needs to be installed.
Remove the bracket and install the lower anchor following step #3
5. Install the bracket -both screws- and mount the rod

And the last task is to hang those curtains!

All you need is a little bit of patience. ;)
Oh, and this is how those curtains looked right after installation. Full of wrinkles.

Ha, that wasn't big trouble. Using a fabric steamer might be the easiest way to remove wrinkles from curtains.
I first got rid of all the wrinkles.
I installed a blackout Roman shade in my son's room. I thought it was enough to keep the room dark when he wanted it dark. But it looked like nope. It wasn't enough. He kept complaining about the amount of light from the street lights during nighttime that came into his room through the sides of the Roman shade.
He kept pulling the shade to whatever side he wanted it on, and to make matters worse, he managed to pull the entire shade off the window.
I was busy with other significant projects around the house, but I asked the mister to go and re-install the Roman shade and hang the new curtain I had bought. Well, he went the easy road and only installed this:
I couldn't believe it!! 😠
Once all the markings were done, he could simply install the brackets, mount the rod, and hang the new curtains.
Well, as it happens to many people, he doesn't like installing those brackets. He usually damages the anchors or the wall where they need to be mounted.
Keeping that in mind, I'm here to tell you, as I told him, that installing those anchors is easy. I promise.
The secret: Do it slowly, use hand tools (although, if you're careful, you can use a drill) and be patient. That's it.
I won't bother telling you how to measure or how high those curtains need to be. I just want you to know how to install those brackets nicely.
1. Mark the location on the wall where those brackets need to be installed.
I usually trace the entire hole(s) area.
2. Use a nail and a hammer to find out if there's a stud right behind your mark on the wall
If both of your brackets have a stud behind where to mount them, you're the luckiest person on earth!
If only one of the brackets aligns with a stud on the wall, that's good, too. You only need to drive the screws onto the stud to mount that bracket. Driving the screws onto wood is the strongest way to mount those brackets. No need to add anchors.
However, if you don't have studs right where you made those markings, you need to add the anchors that came with the brackets.
The first step in installing the anchors, after knowing where to install them, is to make a little hole in the Sheetrock where you made that mark. You can use a nail and hammer, or you can use a drill with a drill bit. This is also a good way to know if there's a stud behind that wall. If the nail/bit is driven too easily, there's no stud.
3. Install the top anchor
The anchors are made of plastic, and they're fragile, and the Sheetrock is fragile, too. Here is where you need to go SLOWLY and use a screwdriver instead of a drill. The pilot hole you previously made is a good starting point. Continue driving the anchor, turning it clockwise with the screwdriver until it gets flush with the wall.
This is the part that my husband always had trouble with because he kept on using a drill. A few times, the anchor got damaged, but most of the time, the wall crumbled with the impact he gave it with the drill.
Remember that you can use a drill if you know how to operate it. For this type of work, you need to adjust it to deliver the least amount of power.
4. Install the bracket and mark the location for the second anchor
Bring your bracket on top of the already installed anchor and drive that top screw. Set it in place and then mark the spot where the lower anchor/screw needs to be installed.
Remove the bracket and install the lower anchor following step #3
 |
Husky Diamond Tip Magnetic Screwdriver Set |
5. Install the bracket -both screws- and mount the rod
All you need is a little bit of patience. ;)
Oh, and this is how those curtains looked right after installation. Full of wrinkles.
I first got rid of all the wrinkles.
 |
Conair Extreme Steam Fabric Steamer |
Then, I made the pleats and flattened them out using the steamer again. Those pleats looked sharp at the beginning.

But after shaking the entire curtain a little bit, the sharpness went away, and they looked more natural.

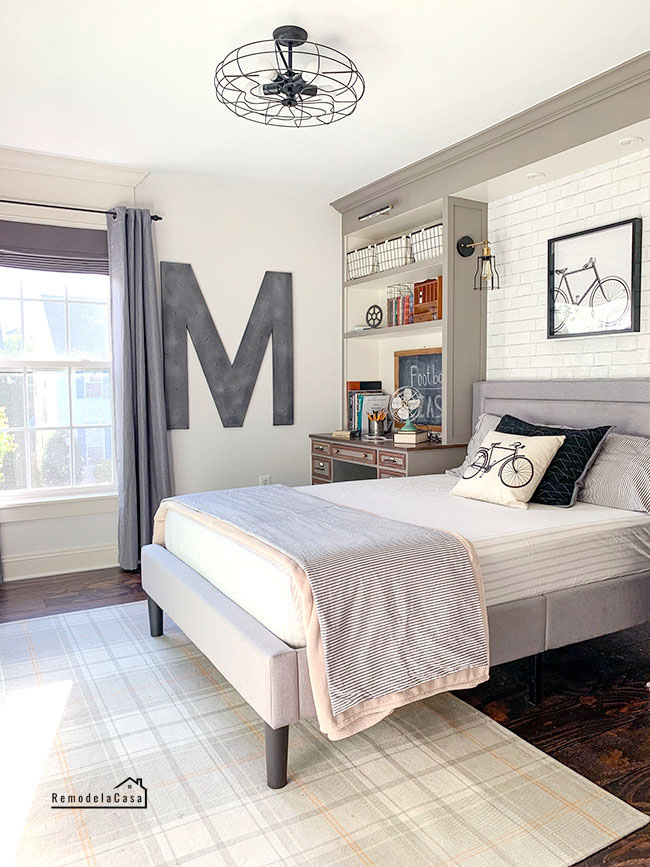
The boy is happy with this curtain configuration. No more light coming in from the sides.
But after shaking the entire curtain a little bit, the sharpness went away, and they looked more natural.
The boy is happy with this curtain configuration. No more light coming in from the sides.
 |
| | Curtains | Roman Shade | Letter M | Sliding Barn Door |
I bought the curtains at Costco. They're thermal, darkening curtains, and the price was around $15 for the pair.
 |
| Teen Boy Room Makeover | Bed | Build-ins | Light |
The Roman shade was re-installed, and it's working nicely again.
This room is now like a little cave. The boy likes to keep it dark. I have to go in there from time to time to open the curtains and the window and let some light and fresh air in!
Well, my friends, I hope this can help with your next curtain rod installation.


This room is now like a little cave. The boy likes to keep it dark. I have to go in there from time to time to open the curtains and the window and let some light and fresh air in!
Well, my friends, I hope this can help with your next curtain rod installation.

*This post contains affiliate links.

Thanks for the tips! I have some blackout curtains ready to install and will use these fab ideas. Your son's room looks great.
ReplyDelete