
Thinking of enclosing that big refrigerator that you have in your kitchen? Well, that's a great way to make that big monster look a bit smaller and to give your kitchen a more professional look.
This is the way that my kitchen looked at the beginning of this makeover, and that refrigerator seemed to fill half the space!

*This post contains affiliate links for your convenience. Click here to read my full disclosure policy.
The new stainless steel appliances arrived sooner than expected and that fridge looked even bigger than the one we had before.

This is the way I wanted it to look but doing it myself:

The tools materials you'll need:
- 1 36 x 24 x 24 Above the refrigerator cabinet
- 1 Sheet of ¾” plywood - Cut in the middle (lengthwise)
- 2 12' Parting bead molding
- Wood glue
- 1-1/4" screws
- 2-1/2" screws
- 3 90-degree angles (L-brackets)
- Drill
- Paint supplies
Instructions:
The first step in this refrigerator enclosure project was to remove the cabinet above the fridge. This cabinet was only 12” deep and I needed one 24” instead.
The most affordable and quick solution was to buy a 36" x 24" x 24" refrigerator cabinet, doors included.

PREPARE THE SIDE PANELS
A sheet of ¾” plywood 4’x 8’, was cut in half/lengthwise at the home center to create the side panels.
Parting bead molding was installed all along the front edge of the plywood panels to cover up those rough edges. Use wood glue and a few brad nails to better secure this small molding.
 |
| Here you can see the parting bead at the edge of the plywood |
ASSEMBLE THE ENTIRE STRUCTURE
Attach the side panels to the top cabinet with 1-1/4" screws.We assembled it off-site, working on the floor and it was kind of difficult for me and the hub to make it stand up and bring it to its place just 5 feet away.
The next step was to secure this refrigerator enclosure to the left base and top cabinets and to the back studs on the wall, making sure it was level.
It looked like a big cabinet with wobbly legs! The left leg was attached to the base cabinet on the left with screws front and back, and the right leg was attached to the wall behind, and to the floor with L brackets.


Make sure to drive a few 2-1/2" screws from the inside of the fridge cabinet onto the studs on the wall.
Finally, a small piece of wood was positioned at the bottom of the top cabinet just to the top of the refrigerator to close up this gap and make the whole structure sturdier.

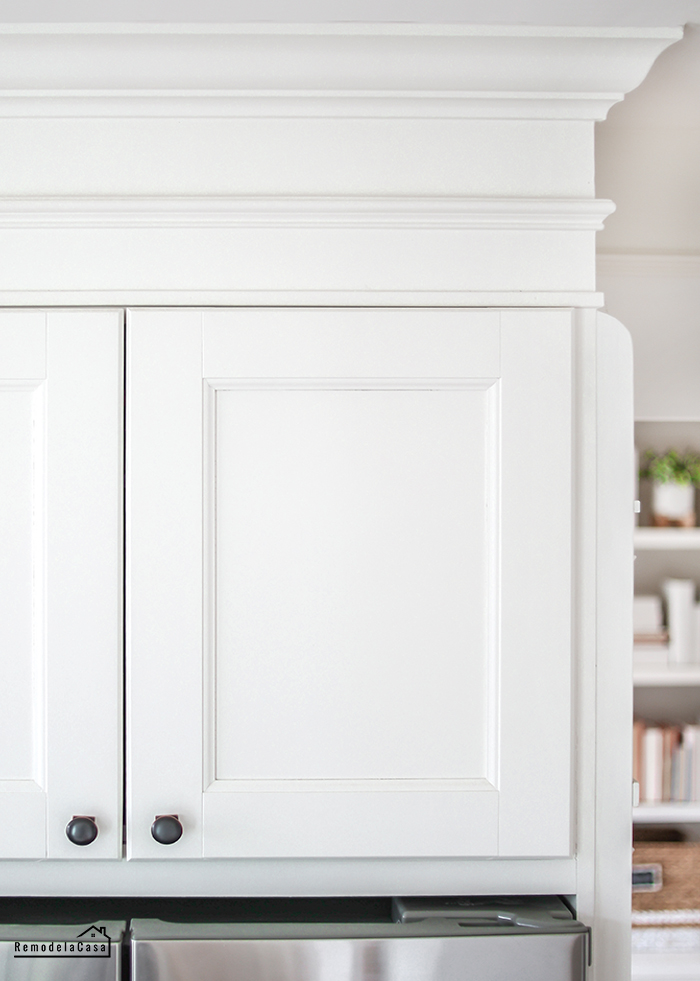
Again, after caulking, sanding, and painting this is the final result:

And here, a front view of the fridge enclosure after other cosmetic changes that were given to this kitchen.


My next project: How to Build a Range Hood.

You might also like to see how to keep the cabinet above the fridge organized with a tray divider.

For more DIY Kitchen ideas check these out:
How to paint the cabinets.
Install a marble backsplash.
Add moldings to your kitchen cabinets
Closing the space above the kitchen cabinets
Update the kitchen island
Tips about installing recessed lights
Final kitchen reveal
Kitchen cost breakdown
1 ½ Year Later How the Kitchen is Holding up
Build-in Plate Rack
Pull Out Shelves in Pantry
LG Appliances Review and Complain

Amazing! I've been wanting to do this myself, and have pinned a lot of ideas on pinterest but couldn't find anyone who had actually DIYed it! Thank you for sharing your ideas. Found you through our friend Kristin at My Uncommon Slice of Suburbia. :)
ReplyDeleteHeather
Wow! Beautiful!
ReplyDeleteAmazing! I found you through French Country Cottage. I have Oak cabinets that I have come to hate.
ReplyDeleteKatie
beautiful job! Which IKEA cabinet did you use that match the existing doors so well?! What is the cabinet paint color and did you paint the ikea refig cabinet doors too? I am sur eto have more questions soon, as we are doing a very similar redo:)
ReplyDeleteI bought a plain cabinet for around $60. The doors were about $130. sorry, I don't remember the style. I tried to match what I have. Is not a perfect match! but yes, I did paint them (the doors) the same color as the cabinets to blend them in.
ReplyDeleteDid you buy a base cabinet from Ikea or is it actually a wall cabinet?
DeleteLola, that's an over the fridge cabinet, 36 w x 24 h x 24 d. You buy the cabinet and doors separately.
DeleteWow, this is wonderful!
ReplyDeleteGrweat job...as usual! I am addicted to Ikea...but we live far enough (4+hours away) :)
ReplyDeleteThat looks fantastic. I was wondering how you matched the doors too, but I saw your answer above.
ReplyDeletelove this look what a great job u have done!!
ReplyDeleteAwesome! That looks wonderful! An entirely different price range of kitchen!
ReplyDelete-Trish
Love it! I need to do this to 'finish' off my kitchen. The fridge just looks wierd with no overhead cabinet, thank you for the inspiration and great tutorial.
ReplyDeletethis is SO smart! I'm pinning this for our future kitchen plans. I'd also love for you to share this at my link party http://www.addhousewife.com/2012/08/pin-inspiration-47.html I'm a new linky follower :D
ReplyDeleteBrilliant, beautiful, and frugal. Love it.
ReplyDeleteI see you're back from Colombia sweet friend. You must be sad to have left your family, but happy you spent some time with them too. I need to do just this as soon as we change our fridge for one like yours, lol..I love the freezer in the buttom, the European way. Our top cupboard is going to have to come off, to be cut shorter and placed in the top again, so I'm very inspired!!
ReplyDeleteHugs from Home Sweet Home,
FABBY
Wow! You have so many great posts (I've spent the past 30 minutes just flipping from one thing to another in your blog)! I love that it is something simple, but makes a huge impact.
ReplyDeletewow this is awesome! you are an inspiration! Where did you get the doors from? Seems like they are bigger than the old cabinet, no?
ReplyDeleteThanks Monika! the doors are also from Ikea, as stated before, they're not a perfect match, but they do belong to the new over the fridge cabinet.
ReplyDeleteLooks wonderful; thanks for sharing. I've saved this for my own kitchen re-do.
ReplyDeleteI'm wondering how you screwed the unit to the existing bottom cabinet, as the countertop extends farther than the cabinet, does it not?
Thanks Anonymous! This cabinet was built before installing new countertops. It was screwed flush to the base cabinet to the left, then the new counters were installed.
ReplyDeleteThanks Cristina!
ReplyDeleteSo creative... this will be on my to do list when a chance! Thanks for the idea!
ReplyDeleteI LOVE this blog!! There are so many of your projects that I want to do to my house, the first of which was painting our cabinets. I have been wanting to fill in the space above them but hadn't seen such a great way to do it until your post. We are starting this weekend. I have a couple of questions, but I will ask them as we go as to not bombard you! Also, I don't know if you have a personal email that you would prefer me to ask, but if so let me know! Okay, about the refrigerator cabinet. Did you remove the floor trim so that the long pieces could be flush with the wall?
ReplyDeleteThanks Patrick! Yes, the baseboard was removed from the wall but it was saved and used on the side panel later on.
ReplyDeleteGreat! Thanks! We are just about to finish the moulding at the bottom of the cabinets and I was wondering if you took it around the side that the refrigerator goes against? I am assuming no since the enclosure would butt up against it...
ReplyDeleteThat's correct, NO! You can write to me at remodelandolacasa@gmail dot com
ReplyDeleteI love your kitchen! We are starting our kitchen remodel next summer. Lots of great info here!
ReplyDeleteBrilliant! Bravo! I sooooooo love your kitchen! Thanks for the inspiration and tutorial!!!!
ReplyDeleteIt's beautiful! And so is your refrigerator! I'm more of a commercial refrigeration kind of guy myself but I can definitely appreciate a fine domestic refrigerator when I see one.
ReplyDeleteAwesomeness!!! Thanks for sharing in such detail!
ReplyDeleteGoing to do this to my refrigerator soon. Just wondering if you show how you finished off the cabinet with the crown molding. Thanks.
ReplyDeleteHi Carol, The top part was finished off with the rest of all the other cabinets. The post is how to close the space above the kitchen cabinets. Here's the link: https://goo.gl/rcm9V4
DeleteGood luck with your fridge enclosure!